
Just like many modern printers, the HP Deskjet 2135 comes equipped with a handy scan feature. This function is incredibly useful for both home and office environments, allowing you to convert physical documents into digital formats like images or PDFs. To utilize the scanning capability of your HP Deskjet 2135, the first and most crucial step is to ensure that the printer driver is properly installed on your computer. Once the driver is set up, you’re all set to start scanning.
It’s worth noting that for a smoother scanning experience, Windows 7 is often recommended. In some instances, Windows 8 users have reported occasional glitches where the scanning application might not open correctly, hindering the scanning process. Unlike some printers that have dedicated scan buttons directly on the device, the HP Deskjet 2135 requires you to initiate the scan through the HP software on your computer. Let’s walk through the simple steps to scan your documents using this printer.
Scanning Documents with HP Deskjet 2135: A Step-by-Step Tutorial
If you’re new to scanning with your HP Deskjet 2135, here’s a straightforward guide to help you through the process. Follow these easy steps to scan your documents effectively:
-
First, power on your HP Deskjet 2135 printer and connect it to your laptop or PC using a USB cable. Ensure the connection is stable for uninterrupted scanning.
-
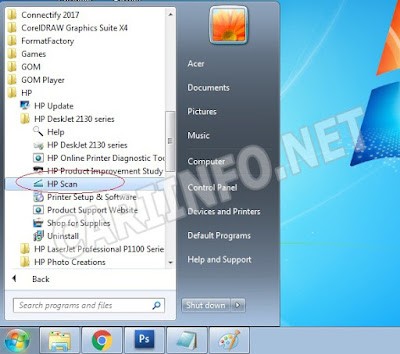
Once connected, you need to open the HP Scan application on your computer. To do this, click on the Windows menu, then navigate to All Programs (or All apps in newer Windows versions), find the HP folder, then HP Deskjet 2135 Series, and finally select HP Scan. Refer to the image below for visual guidance.
-
Prepare the document you intend to scan. Place it on the printer’s scanner glass. Keep in mind that the maximum supported document size for scanning is typically A4 paper.
-
In the HP Scan application, you will find various settings that you can adjust according to your preferences. This includes choosing the file type for your scanned document (like JPEG, PDF, etc.), setting the desired size, and selecting the color option for the scan (color or black and white). The image below illustrates these settings within the HP Scan application.
- Once you have configured the scan settings to your liking, click the Scan button within the application. Wait for the scanning process to complete. The progress will usually be displayed on the screen.
- After the scan is finished, the application will typically display a preview of your scanned document. If you are satisfied with the result, click Save to store the scanned document on your computer. You can choose the location and filename for your saved scan.
Your document is now successfully scanned and saved to your chosen location on your computer. This is a simple and effective way to digitize your documents using the HP Deskjet 2135 printer. We hope this guide has been helpful and easy to follow. If you have any questions, feel free to ask in the comments section below.