
The automotive customization scene is constantly evolving, and 3D scanning technology is becoming an increasingly vital tool for enthusiasts and professionals alike. In a recent webinar, SHINING 3D expert Matt Perez showcased the capabilities of the EinScan Pro HD 3D scanner in capturing precise car part data for wide body design modifications. Using the EinScan Pro HD in conjunction with EXScan Pro scanning software and Fusion 360, Matt demonstrated a streamlined workflow from physical car to digital design.
This article will delve into the key insights from Matt’s webinar, providing a comprehensive guide on how to effectively use the EinScan Pro HD to scan a car, process the data in EXScan Pro, and prepare it for design modifications. Whether you’re aiming to create a custom wide body kit or undertake other automotive design projects, understanding these steps is crucial for achieving accurate and high-quality 3D scans.
Mastering the Scan: EinScan Pro HD & EXScan Pro Workflow
The process of 3D scanning a car for design purposes typically involves a structured approach, breaking down into four fundamental stages:
- Scanning the Car Part: Capturing the raw 3D data of the physical car component.
- Mesh Processing: Refining the raw scan data to create a clean and usable 3D mesh.
- Coordinate System Alignment: Orienting the 3D mesh within a digital workspace for precise design integration.
- 3D Model Design: Utilizing the processed scan data as a foundation for creating custom designs in CAD software.
For large objects like car bodies, Matt recommended utilizing the rapid scan and hybrid alignment modes on the EinScan Pro HD. A key practical tip shared was the strategic use of markers. Ensuring that at least four markers are always within the scanner’s field of view is crucial for maintaining tracking and data accuracy during the scanning process, especially when working on large surfaces.
Once the scanning is complete, EXScan Pro software provides the tools to process the captured data. This includes mesh processing and aligning the mesh to a coordinate system. After these steps are completed within EXScan Pro, the data is ready for seamless import into Fusion 360 or your preferred CAD software to begin the design phase. For a more detailed walkthrough of each step, you can refer to the full webinar replay video.
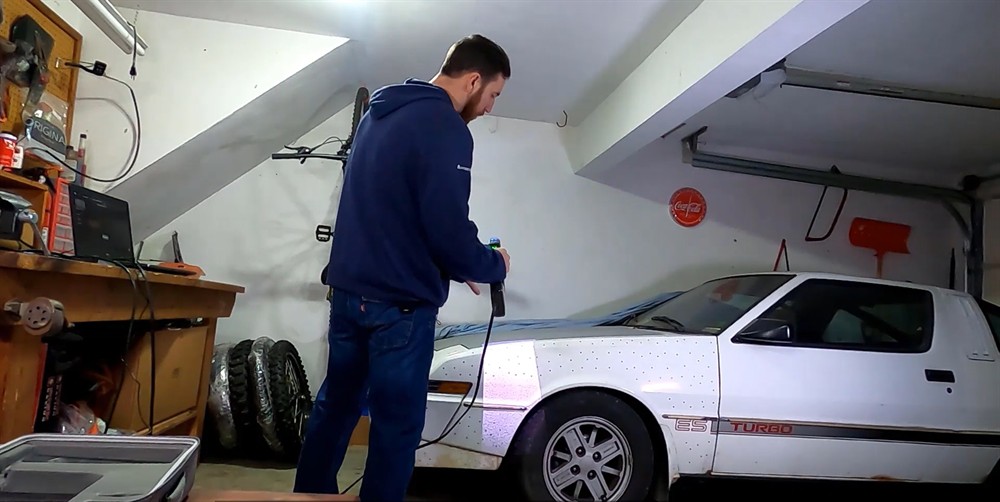
Step 1: Utilizing the EinScan Pro HD multifunctional 3D scanner to capture 3D data of a car component.
Step 2: Employing EXScan Pro software tools for mesh processing tasks, such as hole filling, to refine the 3D scan data.
Step 3: Aligning the processed 3D scan to a coordinate system within EXScan Pro for precise design integration.
Step 4: Designing a custom wide body component in Fusion 360, leveraging the accurate 3D scan data of the car.
Selecting the Right Scan Mode for Your Automotive Project
The EinScan Pro HD is a versatile tool, offering multiple scan modes to accommodate various object sizes and scanning requirements. Understanding these modes is key to optimizing your car scanning workflow:
-
Fixed Scan Mode: Ideal for smaller, stable car parts. In this mode, the EinScan Pro HD is mounted on a tripod, often used in conjunction with a turntable for automated scanning. This mode is best suited for components that can be easily placed on a turntable, allowing for precise and detailed capture.
-
Handheld Rapid Scan Mode: The go-to mode for larger car sections and entire vehicles. This handheld mode allows you to move freely around the car, quickly capturing data. It’s perfect for situations where object mobility is limited or when scanning large surfaces efficiently.
-
Handheld HD Scan Mode: For intricate details and high-resolution scans of smaller car parts. Similar to the rapid scan mode in its handheld operation, the HD scan mode excels in capturing finer details. Choose this mode when accuracy and capturing complex geometries are paramount for smaller components.
Advanced Scan Settings for Optimal Car Scans
Each scan mode within the EinScan Pro HD software offers customizable settings to fine-tune the scanning process.
Fixed Scan Mode Settings
The fixed scan mode provides unique settings such as HDR (High Dynamic Range), which enhances the scanner’s ability to capture details in varying lighting conditions. This is particularly useful when scanning car parts with reflective or dark surfaces.
The turntable option is another exclusive setting, enabling semi-automated 3D scanning. By setting the software to rotate the turntable at specific intervals (e.g., every 30 degrees), the scanner can systematically capture the object from multiple angles, streamlining the data acquisition process and ensuring comprehensive coverage. Coded markers on the object or turntable can further automate scan alignment.
Scan settings interface within EXScan Pro for the Fixed Scan mode, showcasing options for HDR and Turntable control.
Handheld HD Scan Mode Settings
In handheld HD scan mode, users can choose between Classic and High-detail operation modes. While both maintain a standard speed of 10 frames per second (FPS), the High-detail mode necessitates a reduced working distance to achieve its enhanced resolution. Selecting the appropriate operation mode depends on the level of detail required for your specific car scanning task.
Scan settings interface in EXScan Pro for Handheld HD Scan mode, highlighting the Classic and High-detail operation mode selections.
Handheld Rapid Scan Mode Settings
The handheld rapid scan mode mirrors the HD mode’s alignment process but diverges in its operation mode options. It features a Classic option, capturing at 15 FPS. Additionally, it offers Lightning and Lightning+Refine options, pushing the frame rate to 30 FPS at a 1mm resolution with interpolation. While Lightning modes significantly increase scanning speed, it’s important to note that some fine details might be sacrificed for the sake of speed. Choose the mode that best balances speed and detail for your car scanning needs.
Scan settings interface within EXScan Pro for the Handheld Rapid Scan mode, presenting options for Classic, Lightning, and Lightning+Refine operation modes.
Mesh Settings: Refining Your 3D Car Scan Data
Within EXScan Pro’s mesh settings, Filter and Smooth are critical parameters for refining your 3D car scans. The Filter setting analyzes the mesh and distinguishes between high and low areas. A lower filter setting is less aggressive, preserving more of the original scanned mesh. Conversely, the Smooth setting increases mesh density to create a smoother surface.
Matt demonstrated the impact of different mesh settings during the webinar, showcasing how varying filter and smooth values affect the final 3D model. He recommends experimenting with low, medium, and high filter settings in conjunction with high smoothing to understand their effects and tailor them to your design requirements. This iterative approach allows for fine-tuning the mesh to achieve the desired balance between accuracy and surface smoothness.
Visual comparison illustrating the effects of different mesh settings on the resulting 3D model from the same scan data.
Conclusion: Unleash Your Automotive Design Potential with EinScan Pro HD
This article provides a glimpse into the powerful capabilities of the EinScan Pro HD for 3D car scanning and design. For those eager to delve deeper, Matt Perez has created an extensive instructional series on YouTube. This series offers a step-by-step tutorial on the complete workflow, from scanning car parts to designing a custom wide body kit using the EinScan Pro HD, EXScan Pro software, and Fusion 360. If you’re ready to take your automotive design projects to the next level, explore the full tutorial series here. The EinScan Pro HD and EXScan Pro software suite provides a robust and user-friendly solution for transforming your automotive visions into reality.