As a penetration testing tool, Ike-Scan might not be as widely recognized as some of its counterparts, but it holds significant value, especially for security professionals. This open-source utility, compatible with both Windows and Linux, is a powerful asset for network reconnaissance. Under the GPL license, it’s not only free but also allows for modifications and further development.
But what exactly is Ike-Scan, and how can you utilize it effectively? Let’s delve into the details.
Understanding Ike-Scan
Ike-Scan is primarily used to discover Internet Key Exchange (IKE) hosts and to fingerprint them using retransmission backoff patterns. In simpler terms, it helps you identify systems running the IKE protocol and determine the specific implementation they are using.
IKE is a crucial protocol, most notably as a key component of VPN (Virtual Private Network) setups using IPsec (Internet Protocol Security). By scanning for IKE hosts, you can pinpoint potential VPN gateways and servers on a network.
Fingerprinting, in this context, refers to identifying the specific IKE implementation running on the target host. Ike-Scan achieves this mainly by analyzing the retransmission backoff patterns of the responses it receives. Different IKE implementations may exhibit unique patterns, allowing for identification.
Getting Started with Ike-Scan on Kali Linux
Kali Linux, being a distribution tailored for penetration testing, often comes with Ike-Scan pre-installed. Let’s verify and explore its basic usage.
-
Open Your Kali Linux Terminal: Launch the terminal application in your Kali Linux environment.
-
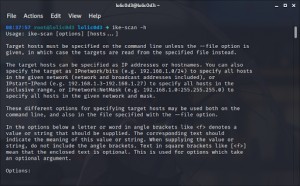
Check Ike-Scan Help Options: To understand the basic commands and options available, type the following command and press Enter:
ike-scan -hThis command will display the help menu, outlining the various options and parameters you can use with Ike-Scan.
This image shows the help output of the
ike-scan -hcommand in a Kali Linux terminal, displaying available options and usage instructions.
Basic Host Scanning with Ike-Scan
Now, let’s move on to scanning for IKE hosts. The most basic command to scan a single host is as follows:
ike-scan <target_host>Replace <target_host> with the IP address or hostname of the system you want to scan. For example, to scan the localhost (your own machine), you would use:
ike-scan 127.0.0.1To scan a remote host, simply replace 127.0.0.1 with the target IP address.
Scanning Network Ranges and Multiple Hosts
Ike-Scan is also capable of scanning ranges of IP addresses and even lists of hosts. Here are a few methods:
-
Scanning a Network Range: To scan all hosts within a specific network, use the CIDR notation (IP address/bitmask). For instance, to scan the 192.168.49.0/24 network, use:
ike-scan 192.168.49.0/24This will scan all IP addresses from 192.168.49.1 to 192.168.49.254.
-
Scanning an IP Range: To scan a specific range of IP addresses, use the format
IPstart-IPend. For example, to scan hosts from 192.168.49.2 to 192.168.49.133:ike-scan 192.168.49.2-192.168.49.133 -
Scanning Hosts from a File: If you have a list of target hosts in a file (e.g.,
targets.txt, with one IP address or hostname per line), you can use the-for--fileoption:ike-scan --file targets.txt
Example: Scanning a Public IKE Server
To demonstrate Ike-Scan in action, let’s use Shodan, a search engine for internet-connected devices, to find a public IKE server.
-
Using Shodan to Find IKE Servers: Go to the Shodan website (https://www.shodan.io/) and search for “IKE”. Shodan will list publicly accessible devices that have responded to IKE-related probes.
This image displays a Shodan search result page showing devices identified as IKE servers.
-
Scanning a Target IP: Choose an IP address from the Shodan results. For this example, let’s assume we picked
67.80.243.80. Run the following command in your Kali Linux terminal:ike-scan 67.80.243.80Ike-Scan will send IKE requests to the target IP and display the results.
This image shows the output of
ike-scan 67.80.243.80command, displaying information about the IKE server at the target IP address.
The output will typically show information about the IKE server, including whether it responded, and potentially some fingerprinting details about the IKE implementation it’s using. For more detailed scanning and options, always refer to the ike-scan -h help menu and explore the various flags available.
Conclusion
Ike-Scan is a valuable tool in your network security toolkit, particularly for identifying IKE hosts and gaining insights into VPN infrastructure. While this guide covers the basics, Ike-Scan offers many more advanced features and options for in-depth analysis. Experiment with different commands and options to fully leverage its capabilities in your security assessments and penetration testing endeavors.