
Computer viruses can be incredibly disruptive, causing a range of issues from system malfunctions to data loss. They can delete essential files, encrypt your data, or even provide hackers access to your personal information. When faced with a virus infection, removing it promptly is crucial. While various methods exist, using Command Prompt (CMD) is a popular approach for some users.
This guide will explore how to use CMD to help remove viruses, along with alternative methods and essential data recovery steps. We will delve into the process, its limitations, and how to effectively protect your system.
Understanding the Damage Viruses Can Cause
Computer viruses come in many forms, each with its own attack style. Essentially, a computer virus is a program that makes your computer act in undesirable ways. These intrusions can be malicious, designed to disrupt your computer’s functions, erase vital files, monitor your activities, or expose your private data to cybercriminals. Viruses can cause significant trouble. Some, like ransomware such as Locky and CryptoLocker, are notorious for deleting or encrypting computer files, sometimes even altering file extensions to .locky or .encypt. Other viruses are designed to hide files, making them difficult for users to find and access.
Recovering Files Deleted or Hidden by Viruses
While CMD can assist in virus removal, it’s not designed to recover files damaged or lost due to virus infections. For data recovery, dedicated tools like EaseUS Data Recovery Wizard are essential.
EaseUS Data Recovery Software
- Recovers files lost or deleted due to virus attacks.
- Restores files from emptied Recycle Bin in Windows 10/11 or Trash Bin on Mac.
- Retrieves lost files from HDDs, SSDs, USB drives, SD cards, external hard drives, and other devices.
- Offers free file repair for damaged files after data recovery.
Download for PC Download for Mac
Follow these three steps to recover your files:
Step 1. Launch EaseUS Data Recovery Wizard
Run EaseUS Data Recovery Wizard and select the drive where you lost your files due to the virus. Click Scan to begin the scanning process for all lost and existing data.
Step 2. Deep Scan to Find All Lost Hard Drive Data
EaseUS data recovery software will thoroughly scan the selected drive and find all lost files, including existing and hidden data.
Step 3. Preview and Recover Lost Hard Drive Files
After previewing the files, choose the ones you want to recover and click Recover to save them to a secure location on your PC or another external storage device.
When a virus infects your computer, immediate removal is often the priority. CMD is a method many users turn to for virus removal.
Why CMD Can Be Used for Virus Removal
It’s important to clarify that Command Prompt doesn’t directly scan for and remove viruses in the way antivirus software does. Instead, CMD helps in the virus removal process by revealing hidden virus files on your computer or external storage devices. By making these hidden files visible, you can then manually identify and delete suspicious files that might be viruses. Viruses often hide themselves, so CMD’s function is to expose these concealed files so you can take action. This is primarily achieved using the attrib command.
The attrib command in Command Prompt is used to display, set, or remove file or directory attributes at a selected location. By reversing the “hidden” attribute of a virus, you can make the virus file visible. Once visible, you can locate the virus file and delete it.
How to Remove Virus Using CMD: Step-by-Step
Follow these steps to use CMD for virus removal from your computer or storage devices:
Step 1. Type cmd in the Windows search bar, right-click on “Command Prompt,” and select “Run as administrator.”
Step 2. Type F: and press “Enter.” (Replace “F” with the drive letter of your infected partition or device.)
Step 3. Type attrib -s -h -r /s /d *.* and press “Enter.”
Step 4. Type dir and press “Enter.” This command will display all files and directories within the specified drive.
Step 5. Virus filenames may contain terms like “autorun” and often use the “.inf” extension. If you spot any suspicious files, type del autorun.inf to delete the potential virus file. Replace “autorun.inf” with the actual suspicious filename if different.
Here’s a breakdown of the basic attributes used in the attrib command:
- R – Represents the “Read-only” attribute. Read-only files cannot be edited or executed.
- H – Stands for the “Hidden” attribute, making files invisible in normal file browsing.
- A – Indicates “Archiving,” preparing files for backup.
- S – The “System” attribute, designates a file as a system file, important for OS operation.
- I – “Not content indexed file” attribute, excludes files from content indexing services.
The basic syntax for the attrib command is:
ATTRIB [+ attribute | – attribute] [pathname] [/S [/D]]
Let’s understand the parameters in the command used for virus removal: attrib -s -h -r /s /d *.*
- ‘+ / –’: Used to set (+) or clear (-) attributes. Here, we are clearing attributes.
- ‘attribute’: In our command,
-s -h -rclears the System, Hidden, and Read-only attributes. - ‘/S’: Processes all subdirectories in the specified path.
- ‘/D’: Includes directories in the processing.
- ‘pathname’: Not explicitly specified, meaning it applies to the current directory (the drive letter we entered).
*.*: Wildcard representing all files in all formats.
The full syntax of the attrib command offers more options:
ATTRIB [+R | -R] [+A | -A ] [+S | -S] [+H | -H] [+I | -I] [drive:][path][filename] [/S [/D] [/L]]
Caution: Using Command Prompt incorrectly can lead to system damage. It’s advisable to recover your data first before attempting virus removal using CMD.
If you encounter an “Access denied” message, try these solutions:
- Ensure you are running Command Prompt as an administrator.
- Verify that the file/folder is not currently in use.
- Check account permissions and ensure you have full control over the file/folder (right-click the file/folder/partition, go to “Security”).
- Use the CHKDSK command to check for file system errors (in Command Prompt, type
chkdsk /f [drive letter]:and press Enter).
Manual execution via command lines is better suited for users with some technical expertise. Incorrect commands can cause more severe issues. For a more user-friendly and safer approach, consider using an automated alternative to command lines like EaseUS CleanGenius. This tool is designed to check and fix file system errors, enable/disable write-protection, and update your system with just one click, eliminating the need for complex command-line inputs.
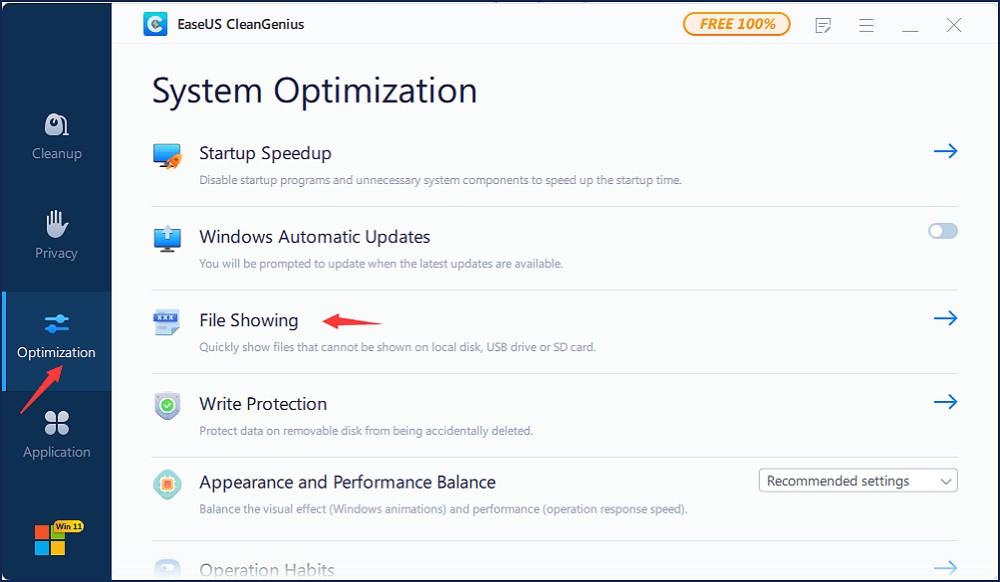
Follow these simple steps to show hidden files using EaseUS CleanGenius:
Step 1. Download and install EaseUS CleanGenius for free.
Step 2. Launch EaseUS CleanGenius, go to “File Showing” in the left panel. Choose the target drive to scan.
Step 3. After the scan, click the View button to check the hidden files.
3 Alternative Methods to Remove Viruses
Besides CMD, other methods can effectively remove viruses from your computer or storage devices, including using antivirus software, Windows Defender, and formatting storage devices.
Method 1. Run Antivirus Software
Most computers have antivirus software installed. When you suspect a virus infection, running a full system scan with your antivirus program is a crucial first step.
Method 2. Run Windows Defender
Windows Defender Antivirus is built into Windows 10/11, offering default protection against viruses, malware, and spyware. If you don’t have third-party antivirus software, using Windows Defender is highly recommended.
Step 1. Go to “Settings” > “Update & Security” > “Windows Security.”
Step 2. Click “Virus & threat protection.”
Step 3. In the “Threat history” section, click “Scan now” to scan your computer for viruses.
Method 3. Format the Infected Device
Formatting a drive completely erases all existing files on the selected partition or drive. This process is guaranteed to remove viruses, as it wipes the entire file system clean. However, formatting results in data loss, so ensure you back up any essential files before formatting.
How to Prevent Virus and Malware Infections
Besides knowing how to remove viruses, preventing infections is equally important. Here are some tips to help protect your computer and external storage devices:
- Install professional antivirus software on your computer and keep it updated.
- Be cautious about the sources of programs you install.
- Avoid suspicious websites and think twice before clicking on links or downloading files.
- Ensure your network connection is secure, especially when using public Wi-Fi.
- Regularly back up your files using free backup software to prevent data loss from virus infections.
Conclusion
Using CMD for virus removal is an indirect method that can be effective in certain situations, particularly for revealing and manually deleting hidden virus files. If the attrib command doesn’t suffice, explore the other methods discussed, such as antivirus scans and formatting, to eliminate malicious software. Remember that virus infections can lead to data loss. Therefore, using a robust data recovery tool like EaseUS Data Recovery Software is vital to recover any lost files as quickly as possible.