
In the realm of web security scanning, proxies play a crucial role. A proxy server acts as an intermediary between your system and the internet, intercepting network traffic. This can be invaluable for various reasons, such as enforcing content filtering policies within organizations, enhancing privacy, or facilitating debugging processes. For web vulnerability scanners like Invicti Standard, utilizing a proxy becomes essential in environments where scanning requests must originate from a specific IP address or a range of IPs.
Invicti Standard offers flexible proxy configurations, allowing you to adapt to diverse network requirements. You can choose to leverage system proxies, configure custom proxies, or opt to bypass proxy usage altogether. These settings apply to both connecting to target websites for scans and receiving software updates. Furthermore, Invicti enables you to define proxy settings within Scan Policies for granular control over your scans.
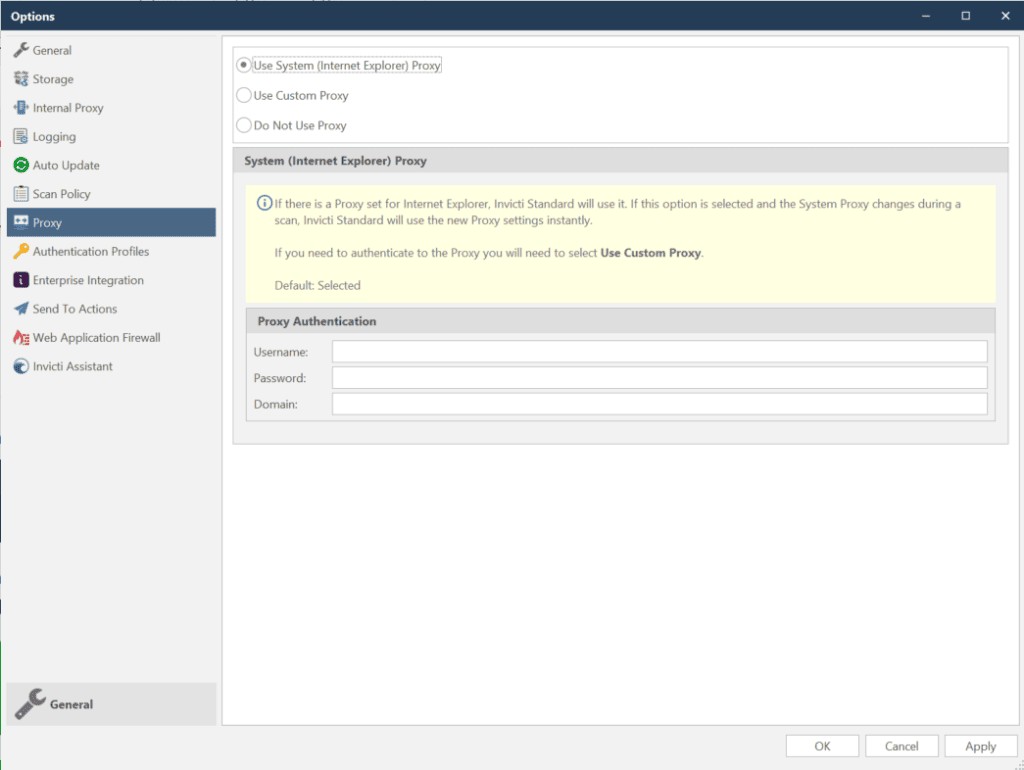
Understanding Proxy Options in Invicti Standard
Invicti Standard provides three primary proxy options to suit your scanning needs:
| Option | Description |
|---|---|
| Use System (Internet Explorer) Proxy | This option, selected by default, utilizes the system-wide proxy settings configured in Internet Explorer. This means Invicti will automatically use the proxy that is already set up for your operating system and other applications. |
| Use Custom Proxy | Choosing this option allows you to manually configure a specific proxy server for Invicti to use. Unlike the System Proxy, a Custom Proxy requires explicit configuration within Invicti. This is beneficial when you need to use a proxy different from your system-wide settings. |
| Do Not Use Proxy | Selecting this option instructs Invicti Standard to bypass any proxy server and connect directly to the target website. Use this when a proxy is not required or when you want to connect directly for testing purposes. |
Configuring Proxy Options in Invicti Standard
Setting up your proxy options in Invicti Standard is straightforward:
- Launch Invicti Standard.
- Navigate to the Home tab and click Options. This action will open the Options dialog window.
- Select the Proxy tab within the Options dialog.
- Choose your desired proxy option: Use System (Internet Explorer) Proxy, Use Custom Proxy, or Do Not Use Proxy.
- Click Save to apply your selected proxy configuration.
Scanning Websites with Invicti Standard Using a SOCKS Proxy
While Invicti Standard natively supports HTTP and HTTPS proxies, direct SOCKS proxy support is not built-in. However, you can effectively conduct web security scans through a SOCKS proxy by employing a third-party proxy server as an intermediary. This intermediary proxy will receive traffic from Invicti and then forward it to your SOCKS proxy server.
This section outlines how to leverage Privoxy, a free proxy server, to facilitate scanning with Invicti Standard through a SOCKS proxy.
Installing the Privoxy Proxy Server
- Privoxy is an open-source, free proxy server distributed under the GNU GPLv2 license. Download the Privoxy proxy server from the official website: http://www.privoxy.org.
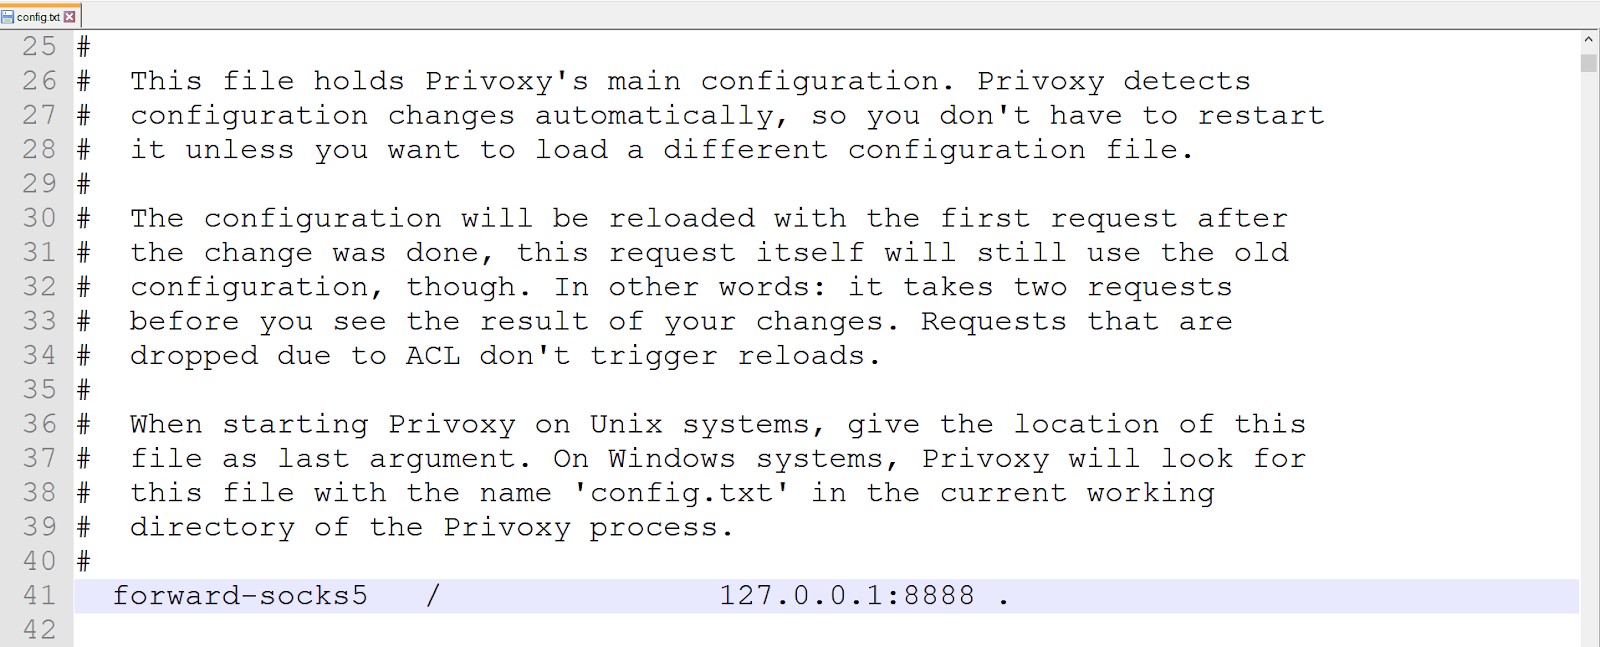
- Proceed with the installation of Privoxy on your system. Once installed and running, locate and open the main configuration file named
config.txtor a similar name depending on your installation.
Configuring Privoxy to Redirect Traffic to a SOCKS Proxy
To instruct Privoxy to forward traffic to your SOCKS proxy, you need to utilize the forward directives within the Privoxy configuration file. These directives specify where Privoxy should redirect the traffic it receives.
Assuming your SOCKS proxy is listening on the address 127.0.0.1 (localhost) and port 8888, add the following directive to your Privoxy configuration file:
forward-socks5 / 127.0.0.1:8888 .This line tells Privoxy to forward all traffic (/) to a SOCKS5 proxy server located at 127.0.0.1 on port 8888.
For more detailed information on SOCKS proxy directives and traffic forwarding within Privoxy, consult the “Forwarding” section of the Privoxy User Manual.
Configuring Invicti Standard to Utilize Privoxy Proxy
By default, Privoxy listens for connections on port 8118 on the localhost address (127.0.0.1). Now, you need to configure Invicti Standard to use Privoxy as its custom proxy, which will in turn route traffic through your SOCKS proxy.
Step-by-step guide to configure Invicti to redirect traffic through Privoxy:
- Open Invicti Standard.
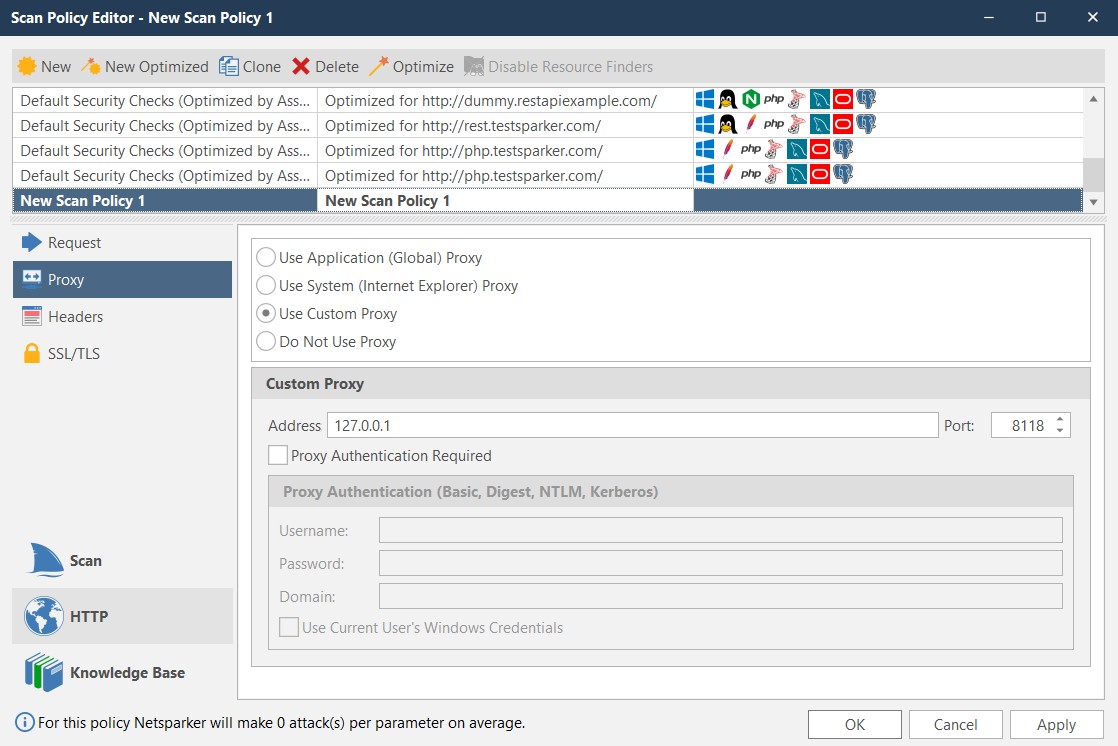
- From the Home tab, click on Scan Policy Editor. The Scan Policy Editor dialog will appear.
- Select the specific Scan Policy you intend to use for your scan.
- In the Scan Policy Editor, navigate to the HTTP section and click on the Proxy tab.
- Choose the Use Custom Proxy option.
- Enter the Privoxy proxy address and port:
- Address:
127.0.0.1(orlocalhost) - Port:
8118
- Address:
- Click OK to save the Scan Policy changes.
With this configuration, Invicti Standard will now route all scan traffic through the Privoxy server running on your local machine. Privoxy, in turn, is configured to forward this traffic to your specified SOCKS proxy. Invicti Standard’s status bar will typically indicate a successful connection to the proxy server.
By following these steps, you can effectively utilize proxies, including SOCKS proxies via Privoxy, to conduct web vulnerability scans with Invicti Standard, ensuring your scans align with your network and security requirements.