
In today’s digital age, scanning documents is a fundamental task, whether for archiving important papers, sharing documents online, or converting hard copies into digital formats. Fortunately, many modern printers come equipped with scanning capabilities, making the process convenient and efficient. If you own a Canon Pixma MP198, you have a versatile device that can handle both printing and scanning.
Perhaps you remember the days when finding a scanner was a challenge, often requiring trips to copy shops or print centers. Thankfully, technology has simplified things. Canon, a well-known and trusted brand, offers a range of multifunction printers, including the Pixma MP series, that combine printing and scanning in one unit. The Canon Pixma MP198, while an older model, remains a reliable option for users needing to scan documents at home or in a small office. Similar models like the Canon MP287 are also widely available, but the scanning process is generally consistent across the Canon Pixma MP series.
If you are fortunate enough to have a printer scanner like the Canon Pixma MP198, knowing how to use its scanning function is essential. If you’re unsure how to get started, don’t worry! This guide will provide a complete walkthrough on how to scan documents using your Canon Pixma printer. Let’s dive into the step-by-step tutorial.
Step-by-Step Guide to Scan Documents with Canon Pixma MP198
Many Canon printer series include a built-in scanner, and the operation is generally quite similar across models. So, even if your exact printer model differs slightly from the MP198, these instructions should still be helpful. Here’s a quick overview of the steps we will cover in detail:
- Prepare your Canon Pixma printer and computer (PC or laptop).
- Gather the document(s) you need to scan.
- Ensure your printer is correctly installed on your computer and properly connected.
- Power on both your computer and Canon Pixma MP198 printer.
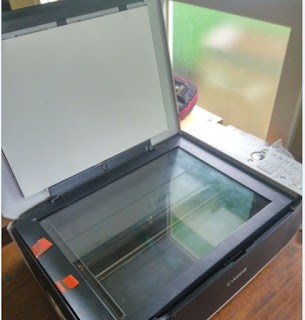
- Open the scanner lid on your Canon printer.
- Place your document face-down on the scanner glass, then close the lid.
- On your computer, open the “Windows Fax and Scan” program.
- Click “Preview” to check the initial scan appearance.
- Once satisfied, click “Scan” to begin the document scanning process.
These steps outline the basic process for scanning with your Canon Pixma MP198. Now, let’s delve into each step with more detailed explanations.
-
Steps 1-3 are straightforward preparation. Ensure your printer is set up and ready. Now, proceed to step 4: Turn on your computer and your Canon Pixma MP198 printer. Make sure both devices are fully powered on before proceeding.
-
Once both devices are ready, open the scanner unit lid on your Canon Pixma printer. This will give you access to the scanner glass where you will place your document.
- Next, carefully place the document you intend to scan face down on the scanner glass. Position the top of the document to your left. This orientation helps prevent the scanned image from being upside down or misaligned.
- After positioning your document, gently close the scanner lid. Ensure it is properly closed to ensure accurate scanning and to prevent ambient light from affecting the scan quality.
So far, so good, right? It’s quite straightforward! Now we’re ready to start the scanning process from your computer. These instructions are based on using a Windows 7 computer, but the process is similar in other Windows versions.
- Move to your computer and open the “Windows Fax and Scan” program. Click on the Start Menu, then “All Programs,” and locate and click on “Windows Fax and Scan.” This utility is a built-in tool in Windows for managing faxes and scans.
Once the “Fax and Scan” window appears, click on “New Scan” to initiate a new scanning session. This will open the scanning interface where you can configure your scan settings.
- The scanner window will now be displayed on your computer screen. This is where you can preview and adjust settings for your scan.
- For a quick and easy scan, you can use the default settings provided by Windows. If you want to see how your scan will look before finalizing, click the “Preview” button. This will perform a preliminary scan and show you a preview of the scanned document.
- Here, you have the option to customize various settings for your scanned file. You can select the file type, such as JPEG, PNG, or PDF. If you need to scan a document to PDF format, simply choose “PDF” as the file type. After previewing and adjusting your settings, click the “Scan” button to initiate the final scan.
-
Wait for the Canon Pixma printer to complete the scanning process. The duration will depend on your scan settings and document size.
-
Once the scanning is finished, the scanned image will appear in the preview area within the “Fax and Scan” window, indicating that the process is complete.
With that, the document scanning process is complete! The scanned file is automatically saved on your computer. You can typically find your scanned documents in the “Scanned Documents” folder within your “My Documents” or “Documents” directory.
This is essentially how to scan documents using a Canon Pixma printer. Feel free to try these steps with your printer scanner. You can see an example of a scanned document result below.
Do you have a clearer picture now? It’s really quite easy to scan with a Canon Pixma printer. If you don’t have a printer scanner, there are alternative solutions. You can even use your Android phone as a scanner!
This concludes our guide on how to scan with a Canon Pixma printer. We hope this tutorial has been helpful. Stay tuned for more tech tips and computer learning resources at bisakomputer.id!