
As a content creator for carcodepro.com and an auto repair expert, I understand the frustration when technology fails us. Just like a vehicle’s engine, your hard drive is crucial for storing and accessing vital data. External hard drives, while incredibly useful for managing data, are not immune to corruption or damage. Experiencing hard drive errors or failures can be deeply disappointing, whether it’s on your computer used for car diagnostics or your personal storage device.
Fortunately, just as there are solutions for car troubles, there are fixes for corrupted hard drives. Windows Command Prompt (CMD), a built-in Windows tool, offers a way to repair hard disks in various scenarios. If you’re a Windows user, perhaps working on an older system like Windows 7, and prefer not to download third-party software, CMD is an excellent option.
If this sounds like your situation, continue reading to learn how to repair an external hard drive using CMD on your Windows system.
Understanding Command Prompt (CMD)
If you’re unfamiliar with Command Prompt, you’re not alone. Many users are unaware of this powerful tool despite using Windows for years. Essentially, Command Prompt (CMD) is a command-line interface that allows you to execute shell commands. These commands are pre-defined and, when used correctly, can perform specific tasks on your computer.
CMD has been an integral part of Windows operating systems since their inception. It can be invaluable for troubleshooting and resolving various Windows errors by running specific commands. Even when an external hard drive becomes corrupted, CMD can often be used to address the issue. You might be wondering what types of hard drive problems CMD can actually fix. Here are some of the common issues it can tackle:
Hard Drive Issues Solvable with Command Prompt
- Logical Errors: Sometimes, software glitches can cause unexpected behavior in your computer. These bugs can lead to what are known as logical errors. While frustrating, these errors can often be resolved using CMD.
- Bad Sectors: A bad sector on a hard drive refers to a small area of storage space that has become unreadable and is damaged. Natural wear and tear from heavy use or physical damage can cause bad sectors. If your hard drive has bad sectors due to heavy usage (and not physical damage), CMD might be able to help repair them.
- Data Loss (To a Certain Extent): In some cases, data loss from a hard drive can also be addressed using Command Prompt, especially if the loss is due to logical errors or minor file system corruption.
To get a basic understanding of Command Prompt and its functionalities, this YouTube video provides a helpful overview.
Watch More >
(This link points to a general YouTube channel as no specific video was provided in the original text)
Repairing Hard Drives Using Command Prompt (CMD)
To repair a corrupted hard drive using CMD, you’ll primarily use the CHKDSK utility, also known as Check Disk. This is an official Windows tool designed to verify the integrity of a hard drive and repair any detected file system errors. CHKDSK is executed within CMD and can be used on both internal and external hard drives, regardless of their storage capacity.
Let’s quickly explore how to use CHKDSK in Command Prompt to repair a corrupted external hard drive on a Windows operating system. While these instructions are demonstrated on Windows 7, the process is largely similar across different Windows versions.
1. Fixing Logical Errors
First, let’s look at how to use CHKDSK to repair a hard drive suffering from logical errors.
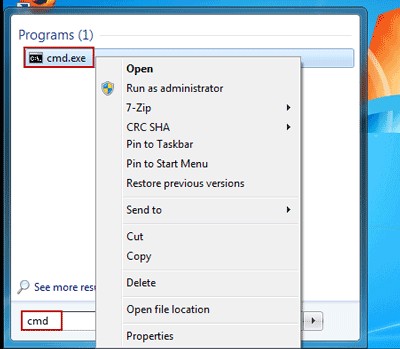
Step 1: Open the “Start” menu and type “CMD”. Right-click on the “Command Prompt” result and select “Run as administrator” to open CMD with administrative privileges. This is crucial for CHKDSK to work effectively.
Step 2: Now, execute the following command to scan your external hard drive for logical errors:
chkdsk f: (Remember to replace “f” with the drive letter assigned to your external hard drive on your computer. You can find this in File Explorer).
Step 3: The previous command only scans for potential errors but doesn’t fix them. To repair the detected logical errors, use this command:
chkdsk f: /f (The “/f” parameter in CHKDSK instructs it to find and attempt to fix logical errors on the hard drive.)
2. Repairing Hard Drives with Bad Sectors and Recovering Lost Data
If the above commands don’t resolve your hard drive issues, it’s likely due to bad sectors. This often also means you might have lost valuable data from the drive. Fortunately, CHKDSK can also be used to locate bad sectors and attempt to recover readable information.
Here’s how to repair bad sectors on a hard drive using CMD:
Step 1: Open CMD as Administrator again, following the same steps as before. Then, run the following command:
chkdsk f: /f /r /x (Here, “/r” tells CHKDSK to locate bad sectors and recover any readable data. “/x” dismounts the drive before scanning to ensure the process isn’t interrupted by external factors.)
Step 2: Wait for the command to complete execution. Once done, type the drive letter of your external hard drive (e.g., f:) and press “Enter”. This changes the current directory in CMD to your external hard drive.
Step 3: Finally, type attrib -h -r -s /s /d *.* and press “Enter”.
This command attempts to recover lost data automatically. After the process finishes, a new folder might be created within your hard drive containing the recovered files.
One-Stop Solution: Data Recovery from Hard Drives
While using Command Prompt for data recovery can sometimes retrieve deleted files, it’s not always effective. In fact, CMD’s data recovery rate is often quite low, meaning you might not recover all your files from a damaged external hard drive.
If you’re facing significant data loss, using professional data recovery software like Wondershare Recoverit is highly recommended. Recoverit is a dedicated data recovery tool with a high success rate of up to 98%. Regardless of the type of error your hard drive is experiencing, Wondershare Recoverit can help you recover deleted files quickly. It supports various storage devices, including hard drives, USB drives, memory cards, and more. The software also supports over 1000+ file types, ensuring comprehensive data recovery.
Download for Windows Download for Mac
In short, Wondershare Recoverit is a comprehensive solution for recovering lost data from a damaged external hard drive. Let’s briefly walk through the steps to recover files using Wondershare Recoverit.
Step 1: Install Recoverit on your computer and ensure your external hard drive is connected. Launch the software and select your external hard drive as the target location. It should be listed under the “External Devices” tab.
Step 2: Click the “Start” button, and Recoverit will begin scanning your hard drive to find all recoverable files. The scan duration depends on the storage capacity and data volume of your drive.
Step 3: Once the scan is complete, Recoverit will display all the recoverable files on your screen. Preview the files you want to restore and click the “Recover” button in the bottom right corner to save them back to your computer or a different storage location. You can also use the “Preview” option to check file integrity before recovery.
Conclusion
Encountering software errors on an external hard drive is a common problem for many users. Instead of panicking, you can troubleshoot the issue by using the CMD commands outlined above to repair your external hard drive. If you experience data loss during the repair process, consider using Wondershare Recoverit to recover your valuable data effectively.
Download for Windows Download for Mac
What’s Wrong with Drive
Recovery Drive Fix Drive Format/Wipe Drive Know Your Drive