The HP Deskjet 2135 printer is a versatile device for both home and office use, and as many users know, it comes equipped with a handy scan feature. This function allows you to convert physical documents into digital formats like images or PDFs, which is incredibly useful for archiving, sharing, and editing documents. If you’re new to scanning or just want a refresher, this guide will walk you through the easy steps to scan with your HP Deskjet 2135 printer. The most crucial step to ensure a smooth scanning process is to have the correct printer driver installed on your computer. Once that’s set, you’re ready to begin scanning. Unlike some printers with dedicated scan buttons, the HP Deskjet 2135 requires you to initiate the scan through the HP software on your computer. Don’t worry, it’s a straightforward process!
Scanning Documents with Your HP Deskjet 2135: Step-by-Step
If you’re unfamiliar with how to use the scan feature on your HP Deskjet 2135, follow these simple steps.
- First, ensure your HP Deskjet 2135 printer is powered on and properly connected to your computer. Use the USB cable to establish a connection between the printer and your laptop or PC.
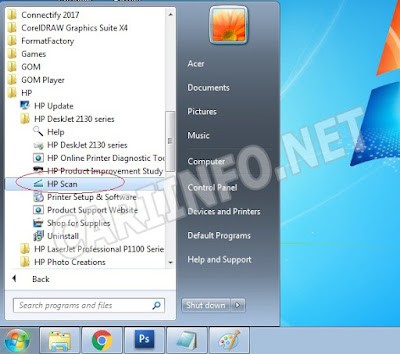
- Once connected, you need to open the HP Scan application on your computer. To do this, click on the Windows menu, then navigate to All Programs or All apps, find the HP folder, then the HP Deskjet 2135 Series folder, and finally select HP Scan. Refer to the image below for visual guidance.
- Prepare the document you wish to scan. Place it on the scanner bed of your HP Deskjet 2135 printer. Ensure that the document is placed correctly, usually face down and aligned with the indicated corner. The printer supports scanning documents up to A4 size.
- In the HP Scan application, you can now configure your scan settings. This includes choosing the file type for your scan output (like JPG, PDF, etc.), the desired size, and whether you want a color or black and white scan. Adjust these settings to match your needs.
- Once you have selected your preferred settings, click the Scan button within the application. The scanning process will begin. Wait for it to complete. The duration will depend on your settings and document complexity.
- After the scan is finished, you will usually be prompted to Save your scanned document. Choose a location on your computer to save the file. Your document is now scanned and saved digitally!
Conclusion
Scanning documents with your HP Deskjet 2135 printer is a straightforward process once you know the steps. By following this guide, you can easily digitize your important documents for various purposes. This simple method ensures you can quickly convert paper documents into digital files using your HP Deskjet 2135. If you have any questions, feel free to ask in the comments below!