
Scanning documents or photos into PDF format on your iPhone is surprisingly straightforward and doesn’t require any additional apps. As your trusted car expert at carcodepro.com, I often need to quickly digitize documents like vehicle registration or insurance papers. I’ve found the built-in scan feature on iPhones to be incredibly handy for this, and it can be just as useful for digitizing photos and other documents.
This feature leverages your iPhone’s camera to scan physical documents, such as IDs, printed photos, receipts, and more, directly into high-quality PDF images. It’s a seamless process, much like taking a photo, but with the added benefit of automatic document detection and PDF conversion.
In today’s fast-paced world, the ability to quickly scan documents is essential for various tasks, from submitting paperwork to archiving important photos. Gone are the days when scanning meant a trip to a copy shop with a bulky scanner. Apple has integrated this convenient scan-to-PDF functionality directly into your iPhone, accessible within the pre-installed Notes app.
If you’re looking to scan photos or documents to PDF using your iPhone, here’s a step-by-step guide to get you started:
Steps to Scan Photos to PDF on Your iPhone
-
Open the Notes App: Locate the pre-installed “Notes” app on your iPhone and tap to open it. This is your gateway to the document scanning feature.
-
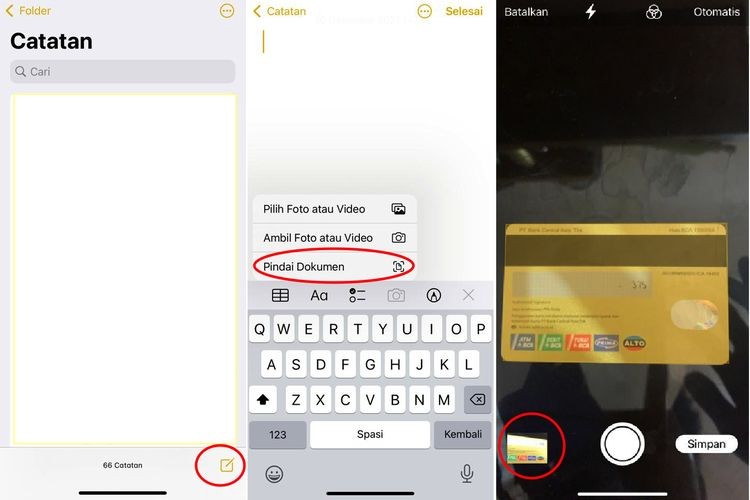
Create a New Note: Once the Notes app is open, look for the compose icon, typically located in the bottom right corner. It usually resembles a square with a pen. Tap this icon to start a new note.
-
Access the Scan Feature: In a new note, you’ll see a toolbar appear above the keyboard. Look for the camera icon within this toolbar. Tap the camera icon to reveal a dropdown menu with several options.
-
Select “Scan Documents”: From the dropdown menu, choose the “Scan Documents” option. This will activate your iPhone’s camera specifically for document scanning.
-
Understand the Scanner Interface: The camera interface for document scanning is slightly different from the standard Camera app. You’ll notice a yellow transparent frame appear on the screen. This frame is your scanning guide.
-
Position Your Document or Photo: Hold your iPhone camera above the photo or document you want to scan. Make sure the document is within the yellow frame visible on your screen.
-
Automatic Scanning: The intelligent scan feature will automatically detect the document’s edges and adjust the yellow frame accordingly. Once it’s properly aligned, the camera will automatically capture the image of the document – no need to press the shutter button.
-
Review and Edit (Optional): After the scan, you’ll see a preview of the captured image. Before saving, you have the option to review and edit the scan. Tap the preview icon (usually a small thumbnail in the corner) to access editing tools. You can crop, rotate, or adjust the color of the scanned image. For instance, you can convert the scan to black and white for a photocopy-like appearance by tapping the filter icon (often represented by three overlapping circles) in the preview mode.
- Save as PDF: Once you are satisfied with your scan and any edits, tap “Done” in the editing interface, and then tap “Save.” The scanned photo or document will be saved as a PDF file directly within your new note in the Notes app.
Now you have a digital PDF copy of your photo or document, easily accessible and shareable directly from your iPhone’s Notes app. This feature is incredibly useful for various situations, ensuring you always have a scanner in your pocket.
Scanning photos and documents to PDF on your iPhone simplifies digital archiving and sharing, making your daily tasks more efficient. Whether it’s for personal records or professional needs, the built-in scan feature is a powerful tool at your fingertips.