It’s incredibly convenient to digitize documents these days. Whether it’s for work, school, or personal administration, the need to scan documents like IDs, receipts, or important papers arises frequently. For iPhone users, the good news is you don’t need to hunt for a separate app to handle this task. Your iPhone has a built-in document scanner that’s readily available within the Notes app.
This feature turns your iPhone into a portable scanner, utilizing the camera to capture documents and convert them into PDF images. Think of it as taking a photo, but smarter – it automatically detects document edges, corrects perspective, and enhances readability.
In the past, scanning often meant a trip to a copy shop with a bulky scanner. Apple recognized the need for a quick and efficient solution, embedding a document scanning tool directly into the iPhone. This eliminates the need for extra apps and streamlines your workflow.
Now, scanning documents is as simple as using your iPhone’s Notes app. If you’re wondering how to scan documents on your iPhone without an app, here’s a step-by-step guide to get you started:
-
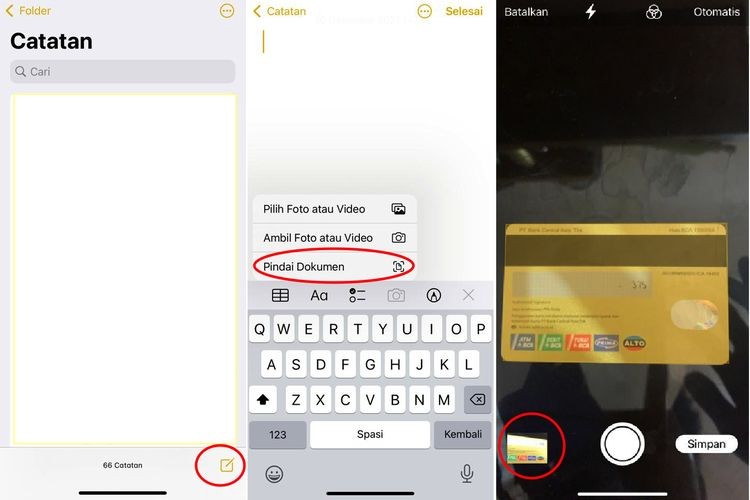
Open the Notes App: Locate the pre-installed “Notes” app on your iPhone and tap to open it.
-
Create a New Note: In the Notes app, look for the icon resembling a square with a pen in the bottom right corner. Tap this icon to start a new note.
-
Access the Camera Options: Once a new note is open, you’ll see a row of icons above the keyboard. Tap the camera icon.
-
Select “Scan Documents”: From the camera options that appear, choose “Scan Documents.” This will launch the document scanning interface.
-
Understanding the Scanner Interface: The camera interface for document scanning is slightly different from the regular Camera app. You’ll notice a yellow transparent frame on the screen.
-
Position Your Document: Hold your iPhone camera over the document you want to scan. Ensure the document is within the yellow frame.
-
Automatic Scanning: The yellow frame will automatically detect the edges of your document and adjust its size accordingly. Once aligned, the iPhone will automatically capture the document – no need to press the shutter button.
-
Automatic Capture and Adjustment: After capturing, the iPhone automatically processes the image, correcting perspective and enhancing clarity.
- Review and Edit (Optional): After the scan, you can preview the captured image by tapping the square icon next to the shutter button. You can also adjust the color of the scan to resemble a black and white photocopy. To do this, tap the three overlapping circles icon in the preview mode. This allows you to enhance contrast and improve readability, especially for text documents.
Once you are satisfied with your scan and any edits, tap “Done” and then “Save.” The scanned document will be saved as a PDF file within your new note in the Notes app.
Conclusion
Scanning documents on your iPhone without needing an extra app is a seamless and efficient process. This built-in feature in the Notes app provides a convenient way to digitize your important papers quickly and easily. Give it a try and experience the simplicity of having a portable document scanner right in your pocket!