
The HP Deskjet 2135 printer is known for its versatility, offering both printing and scanning functionalities in one compact device. Scanning documents and photos is a breeze with this model, making it a useful tool for both home and office environments. Whether you need to digitize important papers, create digital copies of receipts, or share photos online, the scan feature of your HP Deskjet 2135 is ready to assist. This guide will walk you through the easy steps to scan documents using your HP Deskjet 2135 printer, ensuring you get high-quality digital copies quickly and efficiently.
Step-by-Step Guide to Scanning with Your HP Deskjet 2135
Scanning with the HP Deskjet 2135 is straightforward, primarily done through your computer as the printer itself lacks a direct scan button. Here’s how to do it:
-
Power On and Connect Your Printer: Ensure your HP Deskjet 2135 printer is turned on and properly connected to your computer. A USB connection is typically required for scanning as this model doesn’t support wireless scanning.
-
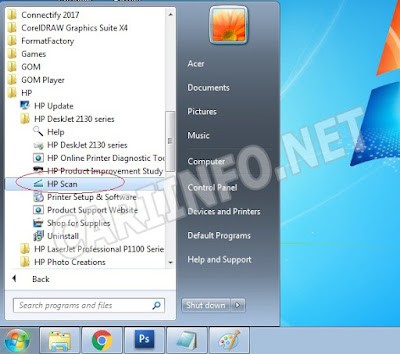
Open the HP Scan Software: To initiate a scan, you need to use the HP Scan software on your computer. Here’s how to find it:
- Click on the Windows Start Menu located at the bottom-left corner of your screen.
- Navigate to All Programs or All apps.
- Look for the HP folder and open it.
- Find the folder named HP Deskjet 2135 series and click to expand it.
- Select HP Scan to launch the scanning application. This software is essential for operating the scan function of your printer.
-
Prepare Your Document for Scanning: Place the document you wish to scan on the printer’s scanner glass. Lift the scanner lid, position your document face down on the glass, aligning it with the guides, and then close the lid. Ensure the document is flat and properly positioned to avoid skewed or incomplete scans. The HP Deskjet 2135 supports scanning documents up to A4 size.
-
Configure Scan Settings in HP Scan: Once the HP Scan application is open, you will see various settings that you can adjust to customize your scan. These settings typically include:
- Document Type: Choose whether you are scanning a document or a photo. This setting helps optimize the scan for text or images.
- Source: Usually, the default is ‘Flatbed’ which is correct for scanning from the scanner glass.
- Color Format: Select ‘Color’ for color documents or photos, ‘Grayscale’ for black and white images with shades of gray, or ‘Black & White’ for simple text documents.
- Resolution (DPI): Resolution determines the quality of the scan. Higher DPI (dots per inch) means better quality but also larger file size. 300 DPI is generally sufficient for documents, while 600 DPI or higher is recommended for photos you intend to enlarge or print.
- File Type: Choose the format in which you want to save your scanned document. Common options include JPEG for images, PDF for documents, and TIFF for high-quality image archiving.
Adjust these settings according to your needs. For standard document scanning, the default settings are often adequate.
-
Initiate the Scan Process: After configuring your settings, click the Scan button in the HP Scan software. The printer will start scanning your document. Wait for the scanning process to complete. A progress bar will usually indicate the status of the scan.
-
Save Your Scanned Document: Once the scan is complete, the HP Scan software will display a preview of your scanned image. Review the scan to ensure it meets your expectations. If you are satisfied, click the Save button. Choose a location on your computer to save the file, give it a name, and click Save again. Your document is now scanned and saved digitally!
Tips for Better Scans
- Clean the Scanner Glass: Dust or smudges on the scanner glass can appear on your scanned images. Regularly clean the glass with a soft, lint-free cloth.
- Proper Document Placement: Ensure your document is placed flat and aligned correctly on the scanner glass.
- Adjust Settings for Different Documents: Experiment with resolution and color settings to find the best options for different types of documents and images.
- Software Updates: Keep your HP printer drivers and software updated to ensure compatibility and optimal performance.
Scanning with your HP Deskjet 2135 printer is a simple process that can be completed in just a few steps. By following this guide, you can easily digitize your documents and photos, making them readily available on your computer. Enjoy the convenience of having a scanner right at your fingertips with your HP Deskjet 2135.