
The HP Deskjet 2135 printer is a versatile device for home and office use, offering both printing and scanning functionalities. Scanning documents and photos can be incredibly useful for digitizing important papers, creating digital archives, or sharing documents electronically. If you’re looking to utilize the scan feature of your HP Deskjet 2135, this guide will walk you through the easy steps to get started. Understanding how to scan with your HP Deskjet 2135 can streamline your workflow and enhance your document management.
What You’ll Need Before You Start
Before you begin the scanning process, ensure you have the following:
- HP Deskjet 2135 Printer and a Computer: Make sure your printer is properly connected to your computer, typically via a USB cable.
- Installed Printer Driver: The printer driver must be installed on your computer. If you haven’t already, you can download the drivers from the official HP support website. This driver package usually includes the necessary software for scanning.
- HP Scan Software: The HP Scan application is the primary tool you’ll use to operate the scanner. It’s usually installed along with the full printer driver package.
Once you have these prerequisites in place, you’re ready to scan.
Step-by-Step Guide to Scanning with HP Deskjet 2135
Here’s a simple, step-by-step process to scan your documents using the HP Deskjet 2135 printer:
Step 1: Power On and Connect Your Printer
First, ensure that your HP Deskjet 2135 printer is powered on. Check that the power cable is securely connected to both the printer and a power outlet. Also, confirm that the USB cable is properly connected between your printer and computer.
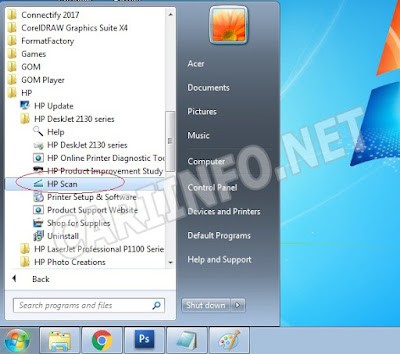
Step 2: Open the HP Scan Application
To initiate the scan, you need to open the HP Scan software on your computer. Here’s how to do it on Windows:
- Click on the Windows Start Menu (usually located in the bottom-left corner of your screen).
- Scroll through the program list or type “HP” in the search bar.
- Look for the HP folder or a program group related to your printer, such as “HP Deskjet 2135 series”.
- Within this folder, you should find HP Scan. Click on it to open the application.
Step 3: Prepare Your Document for Scanning
Now, prepare the document or photo that you want to scan.
- Open the scanner lid of your HP Deskjet 2135 printer.
- Place your document face-down on the scanner glass. Align the document according to the indicators on the scanner bed, usually located at the corners. Ensure the document is placed straight for the best scan quality.
- Close the scanner lid gently.
Step 4: Configure Your Scan Settings
In the HP Scan application, you’ll find various settings to customize your scan. These settings allow you to define the output of your scan.
- Document Type: Choose the type of document you are scanning (e.g., Photo, Document).
- File Type: Select the desired file format for your scanned document. Common options include JPEG for images and PDF for documents. PDF is often preferred for text documents as it preserves formatting and is universally readable.
- Resolution (DPI): Adjust the resolution. Higher DPI (dots per inch) results in a higher quality scan with more detail but also a larger file size. For standard documents, 300 DPI is usually sufficient. For photos, you might consider 600 DPI for better detail, especially if you plan to enlarge or print the scanned photo.
- Color Format: Choose between color, grayscale, or black and white, depending on your needs. For color photos or documents with color elements, select ‘Color’. For black and white documents, ‘Black & White’ or ‘Grayscale’ will be appropriate.
- Paper Size and Source: Usually, the application automatically detects the paper size. However, you can manually specify the size if needed.
Step 5: Scan Your Document
Once you have configured your scan settings, you are ready to start the scanning process.
- Click the Scan button within the HP Scan application.
- The printer will start scanning your document. You will see a progress bar on the screen indicating the scanning progress. Wait until the scan is complete. This might take a few moments depending on the resolution and complexity of the document.
Step 6: Save Your Scanned Document
After the scan is finished, the HP Scan application will typically display a preview of your scanned document.
- Review the scanned image to ensure it meets your expectations.
- Click the Save button.
- Choose a location on your computer where you want to save the scanned file.
- Give your file a descriptive name.
- Click Save to finalize and store your scanned document.
Congratulations! You have successfully scanned a document using your HP Deskjet 2135 printer. You can now access the digital version of your document from the location you saved it. This process is straightforward and allows you to easily digitize your important documents and photos.
Scanning with the HP Deskjet 2135 is a simple process once you understand the steps. By following this guide, you can easily convert your physical documents into digital files for various purposes, whether it’s for archiving, sharing, or editing. If you find this guide helpful, feel free to share it with others who might also benefit from learning how to scan with their HP Deskjet 2135 printer. For any further questions, feel free to leave a comment below!