
The HP Deskjet 2135 printer is a versatile device for both home and office use, and beyond printing, it also offers a handy scanning feature. Scanning documents is incredibly useful for digitizing paperwork, creating backups, or sharing documents electronically. If you’re looking to use the scanning capability of your HP Deskjet 2135, this guide will walk you through the process step-by-step, making it easy for anyone to scan documents quickly and efficiently. You’ll find that scanning with the HP Deskjet 2135 is quite straightforward once you know the steps.
Step-by-Step Guide to Scanning with Your HP Deskjet 2135
Let’s break down the scanning process into simple, manageable steps. Follow these instructions to easily scan your documents using your HP Deskjet 2135 printer.
Step 1: Connect and Power On Your Printer
First, ensure your HP Deskjet 2135 printer is properly connected to your computer. Use the USB cable to establish a connection between your printer and your laptop or PC. Once connected, turn on your HP Deskjet 2135 printer and make sure your computer recognizes it. Having a stable connection is crucial for the scanning process to work smoothly.
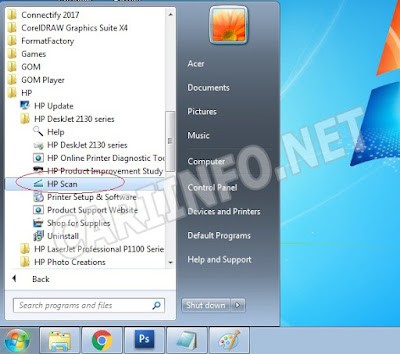
Step 2: Open the HP Scan Software
To initiate a scan, you need to access the HP Scan application on your computer. For Windows users, click on the Windows menu (Start button), then navigate to All Programs or All apps, find the HP folder, then locate the HP Deskjet 2135 Series folder, and finally, select HP Scan. This will open the scanning software interface, ready for you to begin the scanning process.
Step 3: Prepare Your Document for Scanning
Now, prepare the document you intend to scan. Place the document on the scanner glass of your HP Deskjet 2135 printer. Ensure that the document is placed face down and aligned correctly, usually with the corner markers on the scanner bed. The maximum document size supported for scanning is typically A4 paper.
Step 4: Configure Your Scan Settings in HP Scan
Within the HP Scan application, you’ll find options to configure your scan settings. This is where you can customize how your document will be scanned. You can adjust settings like:
- File Type: Choose the format for your scanned document, such as JPEG for images or PDF for documents.
- Resolution (DPI): Select the scan quality. Higher DPI results in better quality but larger file sizes.
- Color Format: Choose between Color, Black & White, or Grayscale depending on your needs.
- Source: Usually pre-set to scanner glass.
- Paper Size: Ensure it matches your document size for accurate scans.
Adjust these settings according to your preferences and the type of document you are scanning.
Step 5: Initiate the Scan Process
Once you are satisfied with your settings, click the Scan button in the HP Scan application. The HP Deskjet 2135 printer will now start scanning your document. Wait for the scanning process to complete. A progress bar will usually indicate the scanning status.
Step 6: Save Your Scanned Document
After the scan is complete, the HP Scan software will typically display a preview of your scanned document. If you’re happy with the result, click the Save button. Choose a location on your computer to save the scanned file and give it a descriptive name. Your document is now successfully scanned and saved digitally.
Conclusion
Scanning documents with your HP Deskjet 2135 printer is a simple process that can be accomplished in just a few steps. By following this guide, you can easily digitize your important documents and images. Whether you need to scan receipts, photos, or important paperwork, the HP Deskjet 2135 provides a convenient and user-friendly scanning solution. Enjoy the ease of digital document management with your HP Deskjet 2135!