In today’s digital age, the need to digitize documents is more prevalent than ever. Whether you’re archiving important papers, submitting assignments online, or simply decluttering your physical space, scanning documents into PDF format is a crucial skill. Often, you’ll need to scan multiple pages and compile them into a single, easy-to-manage PDF file. This guide, brought to you by the experts at carcodepro.com, will walk you through the process of combining multiple scanned pages into one PDF document, ensuring your digital files are organized and professional.
This article focuses on a straightforward method using Microsoft Word, a widely accessible tool, to achieve this task efficiently. While dedicated scanning software and online converters exist, leveraging MS Word offers a familiar and often readily available solution for many users. This method is particularly useful when your initial scans are in image formats like JPG or PNG and you need to convert and consolidate them into a single PDF.
Step-by-Step Guide to Combining Scanned Pages into a Single PDF Using MS Word
If you’ve already scanned your documents and have them saved as individual image files (like JPG or PNG), you can easily merge them into a single PDF document using Microsoft Word. Here’s how:
1. Prepare Your Scanned Images
Before starting, ensure all your scanned pages are saved as image files (JPG, PNG, etc.) on your computer. Organize them in the order you want them to appear in your final PDF document.
2. Open Microsoft Word and Create a New Document
Launch Microsoft Word on your computer and create a new blank document.
3. Insert Your Scanned Images
Now, you need to insert your scanned images into the Word document.
-
Drag and Drop: The simplest way is to drag and drop your image files directly into the Word document. You can drag them one by one or select multiple images and drag them all at once.
-
Using the Insert Menu: Alternatively, you can use the “Insert” tab in the Word ribbon.
- Click on the “Insert” tab.
- Choose “Pictures”.
- Navigate to the location where your scanned images are saved.
- Select the images you want to insert. To select multiple images, hold down the CTRL key while clicking on each image.
- Click “Insert”.
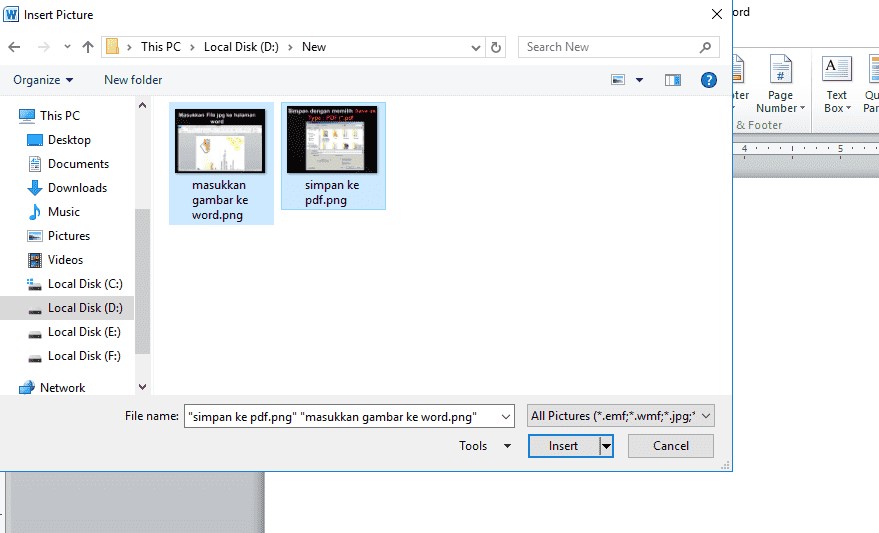 Insert pictures in Word
4. Adjust Image Size and Position
Once your images are inserted, you might need to adjust their size and position to fit properly within the page.
- Click on an image to select it.
- Drag the corner handles to resize the image. Maintain proportions by holding down the Shift key while dragging a corner handle.
- Position the image by clicking and dragging it to the desired location on the page. You can also use Word’s “Layout Options” to further control image placement and text wrapping, though for scanned documents, “In Line with Text” is generally suitable.
Tip: To ensure your PDF looks professional, aim to fill the Word page with each image appropriately, mimicking the original document layout as closely as possible. Consider adjusting margins if necessary to maximize the visible area of your scanned pages. You can adjust margins under the “Layout” tab, then “Margins,” and select “Normal” or customize them further.
Alt text: Setting page margins to normal in Microsoft Word under the Layout tab to optimize space for inserted images.
5. Save as PDF
After inserting and arranging all your scanned pages in the Word document, the final step is to save the document as a PDF file.
- Click on “File” in the top left corner.
- Select “Save As”.
- Choose a location to save your PDF file.
- In the “Save as type” dropdown menu, select “PDF (*.pdf)”.
- Give your PDF file a name.
- Click “Save”.
Alt text: Saving a Microsoft Word document as a PDF file by selecting PDF from the Save as type dropdown menu.
Word will now convert your document, including all the inserted images, into a single PDF file. You can then open the newly created PDF to verify that all pages are correctly combined in the desired order.
Conclusion
Combining scanned pages into a single PDF file doesn’t have to be complicated. By using Microsoft Word, you can easily merge your scanned images into a single, unified document. This method is practical, efficient, and utilizes software that many users already have access to. Whether you’re dealing with two pages or many, this guide provides a clear pathway to digitize and organize your documents effectively. For more tips and tricks on document management and digital tools, keep visiting carcodepro.com, your trusted source for expert advice.