
Antivirus software like Bitdefender is crucial for protecting your computer from malware and online threats. However, there might be situations where you need to temporarily disable it for troubleshooting purposes. For example, Bitdefender might be interfering with the installation of legitimate software, or you might need to diagnose if Bitdefender is causing performance issues on your system. This guide will walk you through the process of temporarily disabling all modules in Bitdefender (including Total Security, Internet Security, and Antivirus Plus). It’s important to remember to re-enable all protection features once your troubleshooting is complete to ensure your system remains secure.
Note: If your specific Bitdefender product version doesn’t include all the features mentioned below, simply disable the modules that are available in your software.
Step 1: Disabling Bitdefender Protection Features
This section covers how to turn off Bitdefender’s core protection modules, such as Antivirus, Firewall, and Advanced Threat Defense.
-
Turning Off the Antivirus Shield:
- Start by navigating to the Protection section, usually located on the left-hand side menu of your Bitdefender interface.
- Within the Protection panel, locate the Antivirus module and click on the Open button to access its settings.
- Go to the Advanced tab within the Antivirus settings.
- Here, you will find the Bitdefender Shield feature. Toggle the switch to the Off position to disable it.
- A pop-up window will ask you to choose the duration for which you want to disable the shield. You can select to disable it Permanently or Until system restart. Choose the option that best suits your needs for troubleshooting and click OK to confirm.
- Next, navigate to the Settings tab within the Antivirus module.
- In the Settings tab, you will find options to control scans for various media. Turn off the following scan options by toggling their respective switches to the Off position:
- Scan CD & DVD
- Scan flash drives
- Scan mapped network drives
-
Disabling the Firewall:
- Return to the main Protection section in the Bitdefender interface.
- Locate the Firewall module.
- Simply toggle the switch associated with the Firewall to the Off position to disable it.
-
Turning Off Antispam:
- In the Protection section, find the Antispam module.
- Toggle the switch to the Off position to disable the Antispam feature.
-
Disabling Ransomware Remediation:
- Locate the Ransomware Remediation module within the Protection section.
- Turn off Ransomware Remediation by toggling its switch to the Off position.
-
Disabling Vulnerability Scan:
- Find the Vulnerability module in the Protection area.
- Disable the Vulnerability scanner by toggling its switch to Off.
-
Turning Off Advanced Threat Defense:
- Within the Protection section, find the Advanced Threat Defense panel and click Open to access its settings.
- In the Settings tab of Advanced Threat Defense, toggle the switch to turn off Advanced Threat Defense.
-
Disabling Online Threat Prevention:
- In the Protection section, locate the Online Threat Prevention panel and click on Settings.
- Within the Online Threat Prevention settings, disable the following features by toggling their switches to the Off position:
- Web Protection
- Search Advisor
- Encrypted web scan
- Fraud protection
- Phishing protection
- Network Protection
- Email Protection. For Email Protection, select the option Don’t scan emails from the dropdown menu if available, or simply turn off the main switch.
-
Turning off Cryptomining Protection:
- In the Protection section, find the Cryptomining Protection module.
- Toggle the switch to the Off position to disable Cryptomining Protection.
Step 2: Disabling Bitdefender Privacy Features
This step involves turning off features designed to protect your privacy while browsing and using your computer.
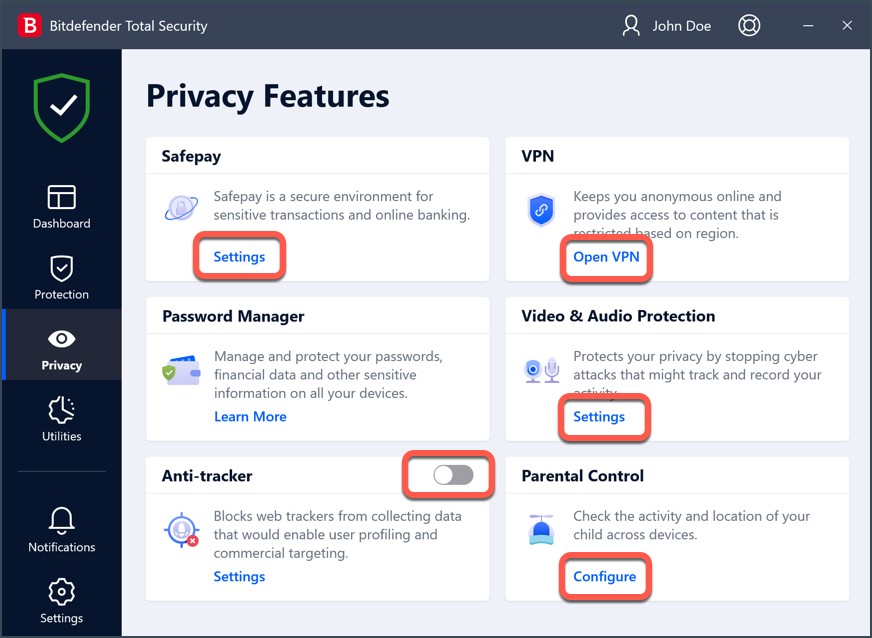 Disable Bitdefender privacy features
-
Disabling Safepay:
- Navigate to the Privacy section, typically found on the left-hand side menu of the Bitdefender interface.
- In the Safepay panel, click on Settings to access Safepay configurations.
- Turn off the following Safepay features by toggling their respective switches to the Off position:
- Safepay notifications
- Automatically open Bitdefender Safepay
- Use VPN with Safepay
-
Turning off Anti-Tracker:
- In the Privacy section, locate the Anti-Tracker module.
- Disable Anti-Tracker by toggling its switch to the Off position.
-
Disconnecting VPN (If Enabled):
- Go to the VPN panel within the Privacy section.
- Click on Open VPN to access VPN controls.
- If the VPN is currently connected, click the Disconnect button to turn it off.
-
Disabling Video & Audio Protection:
- In the Privacy section, find the Video & Audio Protection panel and click on Settings.
- Within Video & Audio Protection settings, disable the following features by toggling their switches to the Off position:
- Webcam Protection
- Microphone monitor
-
Unassigning Parental Control (If Applicable):
- If you have Parental Control enabled, locate the Parental Control panel in the Privacy section and click on Configure.
- This will open Bitdefender Central in your web browser. You will need to sign in to your Bitdefender Central account.
- Once logged in, click VIEW on the child profile that is associated with the PC you are currently using.
- If your PC is listed under the devices monitored by Parental Control, click the vertical ellipsis (⋮) next to “Monitored by Parental Control” and select Unassign from the dropdown menu. This will temporarily disable Parental Control monitoring for your current PC.
Step 3: Disabling Bitdefender Utilities
This final step involves disabling utility features within Bitdefender.
- Deactivating Profiles:
- Navigate to the Utilities section, usually found on the left-hand side menu.
- In the Profiles panel, click on Settings to access profile configurations.
- Turn off Activate profiles automatically by toggling its switch to the Off position. This ensures that no automatic profiles are activated that might re-enable some protection features.
After completing these steps, you have successfully disabled all major protection, privacy, and utility modules in Bitdefender. You can now proceed with your troubleshooting steps.
Important Reminder: Re-enable Bitdefender Protection
Once you have finished troubleshooting, it is crucial to re-enable all the Bitdefender modules you have disabled. Go through each section (Protection, Privacy, and Utilities) and turn the switches back to the On position for each feature you disabled. This will ensure that your computer is once again fully protected by Bitdefender against threats.
By following these steps, you can effectively disable Bitdefender temporarily for troubleshooting and then easily restore its full protection afterwards. If you continue to experience issues even after re-enabling Bitdefender, consider contacting Bitdefender support for further assistance.