
Opening your computer to a system message like “Scanning and repairing drive C” that seems to never end can be frustrating. If you’re facing this issue, this article is for you. We’ll explore why you might repeatedly encounter this message and provide several quick methods to resolve it.
Furthermore, we’ll introduce you to a valuable tool at the end of this article. We’ll present an excellent application that can effortlessly assist you in recovering lost or inaccessible data from your hard drive.
What Causes the “Scanning and Repairing Drive C” Message?
Several reasons can trigger your computer to display the “Scanning and repairing drive C” message. Here are the common culprits:
- Improper Shutdowns: This is a primary cause. When you don’t shut down your PC correctly, whether due to a power outage, forced shutdown, or other interruptions, it can lead to this error.
Hard drives and RAM actively read and write data while your PC is in use. A sudden power loss or abrupt shutdown can interrupt these processes. Consequently, you might lose unsaved data, and in worse scenarios, the hard drive itself could become corrupted, potentially making your data inaccessible.
If you have a habit of forcefully shutting down your PC, it’s crucial to stop immediately if you value your data. Each forced shutdown triggers an automatic drive scan upon the next startup, often resulting in the “Scanning and repairing drive” message as the system attempts to fix any issues arising from the improper shutdown.
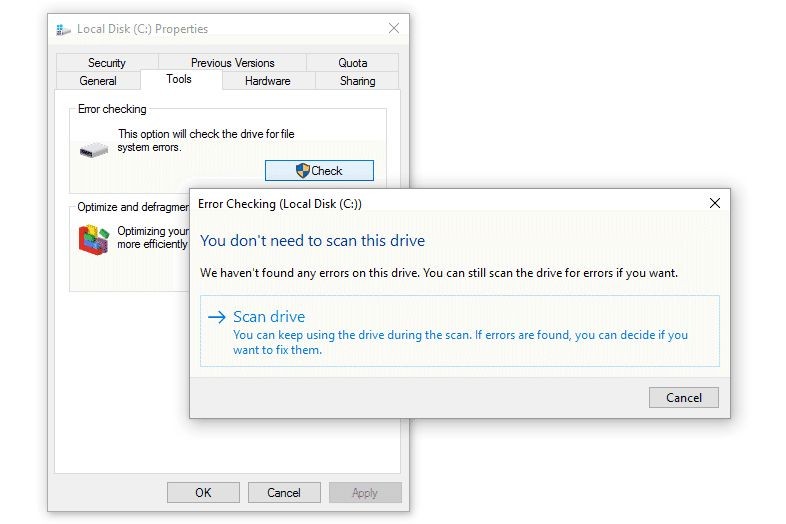
Solution 1: Utilize the Windows Error Checking Tool
A straightforward approach to address this issue is to use the built-in Windows Error Checking tool. This utility can scan and repair potential drive errors. Here’s how to use it:
Step 1: Open File Explorer from your taskbar. In the left-hand menu, click on This PC.
Step 2: Under This PC, right-click on the drive that Windows is reporting issues with (usually Drive C) and select Properties.
Step 3: In the Properties window, navigate to the Tools tab. Under the Error checking section, you’ll see a Check button.
Step 4: If no errors were initially detected, you might still see the option “You don’t need to scan this drive”. However, you can still proceed with a manual scan by clicking Scan drive to ensure everything is in order.
Step 5: If errors are found after the scan, a new window will appear, suggesting you repair the drive. Click on the Repair drive button to initiate the repair process.
Step 6: Once the repair is complete, restart your PC. The “Scanning and repairing drive” issue should now be resolved.
Solution 2: Check Your Drive Status
Checking the drive status can provide insights into any underlying problems your drive might be experiencing. Follow these steps:
Step 1: Open the Control Panel. You can search for “Control Panel” in the Windows search bar. Once opened, click on System and Security.
Step 2: In the System and Security menu, click on Security and Maintenance.
Step 3: Next, select Maintenance to expand its options. Under the Drive status section, you will find the necessary status information about your drives.
Alternative Method: Use WMIC
You can also check the hard drive status using the Windows Management Instrumentation Command-line (WMIC). Here’s how:
Step 1: Press the Windows key + R to open the Run dialog box. Type cmd and press Enter to open Command Prompt.
Step 2: In the Command Prompt window, type wmic and press Enter. Then, type diskdrive get status and press Enter again.
Step 3: After executing the command, the status of your hard drive will be reported. “OK” status indicates the drive is functioning normally.
Solution 3: Run CHKDSK Scan in Safe Mode
CHKDSK (Check Disk) is a powerful and quick utility to scan your computer’s drives for errors and file system issues. Running it in Safe Mode can be particularly effective. Here’s how to do it:
Step 1: Boot Windows 10 into Safe Mode. To do this, exit your Windows account and hold down the SHIFT key while clicking Restart from the Power options.
Step 2: You will enter the Windows Recovery Environment. From here, select Troubleshoot, then Advanced options. Next, choose Startup Settings and click Restart. On the Startup Settings screen, choose option 4 or F4 to Enable Safe Mode, or option 5 or F5 for Safe Mode with Networking, or option 6 or F6 for Safe Mode with Command Prompt. For this method, Safe Mode with Command Prompt is preferable.
Step 3: Once in Safe Mode with Command Prompt, type the following command and press Enter:
chkdsk X: /fNote: Replace X with the drive letter you want to scan and repair (usually c for your primary drive). The /f parameter tells CHKDSK to fix any errors it finds.
Step 4: Wait for the CHKDSK process to complete. This may take some time depending on the size and condition of your drive. After it’s finished, restart your computer normally.
Solution 4: Execute Repair-Volume Command in Safe Mode
Similar to CHKDSK, the Repair-Volume command using PowerShell can scan your drive for potential errors and attempt to repair them. Here are the steps:
Step 1: Boot your PC into Safe Mode using the steps outlined in Solution 3.
Step 2: Type PowerShell in the Windows search box, right-click on Windows PowerShell, and select Run as administrator.
Step 3: In the Administrator PowerShell window, type the following command and press Enter:
repair-volume -driveletter XNote: Again, replace X with the drive letter that needs scanning and repair.
Step 4: Allow the repair process to finish. Once completed, reboot your computer.
Bonus Tip: Check Disk Connections
If you’ve recently moved or replaced your computer’s hard drive and then started encountering the “Scanning and repairing drive” message, a loose connection could be the cause. When handling internal hardware, connection issues between the drive and PC can occur. Double-check your SATA ports and power connections to ensure everything is securely plugged in. Reseating the cables can often resolve connection-related problems.
How to Recover Data from Your Computer When All Solutions Fail?
An unbootable system can be a significant problem, and data loss is a serious concern in such situations. To ease your worries, we introduce Wondershare Recoverit, a powerful data recovery tool. Recoverit is designed to help you retrieve important data when facing issues like the “Scanning and repairing drive” loop and your system becomes inaccessible. This tool is safe, user-friendly, and highly effective in data recovery scenarios. Here’s how you can use it to recover your data:
Download for Windows Download for Mac
Step 1: Create a Bootable Drive
- First, install and launch the Recoverit application on a working computer. Since your Windows 10 PC is unbootable, select the System Crash Data Recovery mode. Then, click Start on the subsequent window.
- You’ll need to choose a USB drive or CD/DVD to create bootable media. Select either option and click Create. Click Format now on the prompt to proceed.
- The process of creating a bootable drive will begin. Do not remove your USB drive or CD/DVD during this process.
Note: You need to change the boot order on your problematic computer to boot from the newly created bootable drive. Check this guide for detailed instructions on how to set your computer to boot from a USB drive.
Step 2: Recover Data from Unbootable Windows 10
- Access the BIOS settings by restarting your computer and pressing the BIOS key (usually F2, DEL, F12, or ESC, depending on your system) during the initial boot screen. Once in BIOS, change the boot order to prioritize booting from the USB drive or CD/DVD you created. Save the changes and exit BIOS. Your computer will now boot from the Recoverit bootable drive. After booting from the drive, Recoverit will launch automatically. Use the WinPE bootable drive to recover your data from the hard disk.
Why Do Many Users Encounter This Issue?
We hope this article has helped you resolve the “Scanning and repairing drive C” issue. We’ve discussed the common reasons behind this error message and provided several simple yet effective solutions. By following these methods, you should be able to fix the problem and regain normal access to your system.
Moreover, we introduced Wondershare Recoverit to help you recover your valuable data in case of severe issues or data loss. With Recoverit, you can be assured that your data remains safe, even when facing challenging computer problems.