
In today’s fast-paced digital world, almost everything is going digital. From resumes and portfolios to important documents, digital formats are becoming the norm. Following this trend, even signatures are now commonly handled digitally, especially with tools like Microsoft Word. If you’re looking to create and insert a signature in Word that looks authentic and scanned, rather than obviously pasted, here’s a comprehensive guide. Let’s dive in!
Step-by-Step Guide to Creating Realistic Scanned Signatures in Word
Here’s a detailed walkthrough on how to create and insert your signature in Word, ensuring it appears as a realistic scan. Follow these steps to achieve a natural, authentic look.
1. Prepare Your Signature File
The first step is to create a digital file of your signature. If you don’t already have one, simply sign your name on a piece of white paper using a black pen. For the best results, use a thicker pen as it will scan more clearly. Once signed, you can either photograph it with your smartphone or scan it using a scanner. Scanning usually provides a cleaner, higher-quality image, which is ideal for a realistic digital signature.
2. Transfer Your Signature File to Your Computer
After capturing or scanning your signature, you’ll need to transfer the image file to your computer. You can do this in several ways. Using a USB data cable is a direct method. Alternatively, you can send the file to yourself via email or use messaging apps like WhatsApp Web to easily transfer the image from your phone to your computer. Choose the method that’s most convenient for you.
3. Open the Word Document
Next, open the Microsoft Word document where you need to insert your signature. Ensure it’s the correct document and that you’re ready to place your signature in the desired location.
4. Insert Picture Using the ‘Insert’ Tab
To ensure your signature is easily adjustable and looks integrated, use the ‘Insert’ function to add your signature image. In the Word menu bar, go to the ‘Insert’ tab, then click on ‘Pictures’. This method allows for better control over the signature’s appearance and positioning within the document.
5. Select Your Signature File
A dialog box will appear, prompting you to locate and select your signature image file. Navigate to the folder where you saved your signature file, select it, and click ‘Insert’. Your signature will now be placed into your Word document.
6. Access the ‘Format’ Tab for Image Adjustments
Once your signature is in the document, click on the signature image. This will activate the ‘Picture Format’ tab in the menu bar. This tab is crucial for adjusting the appearance of your signature to make it look more realistic and naturally integrated into the document.
7. Choose ‘Color’ Options Under ‘Format’
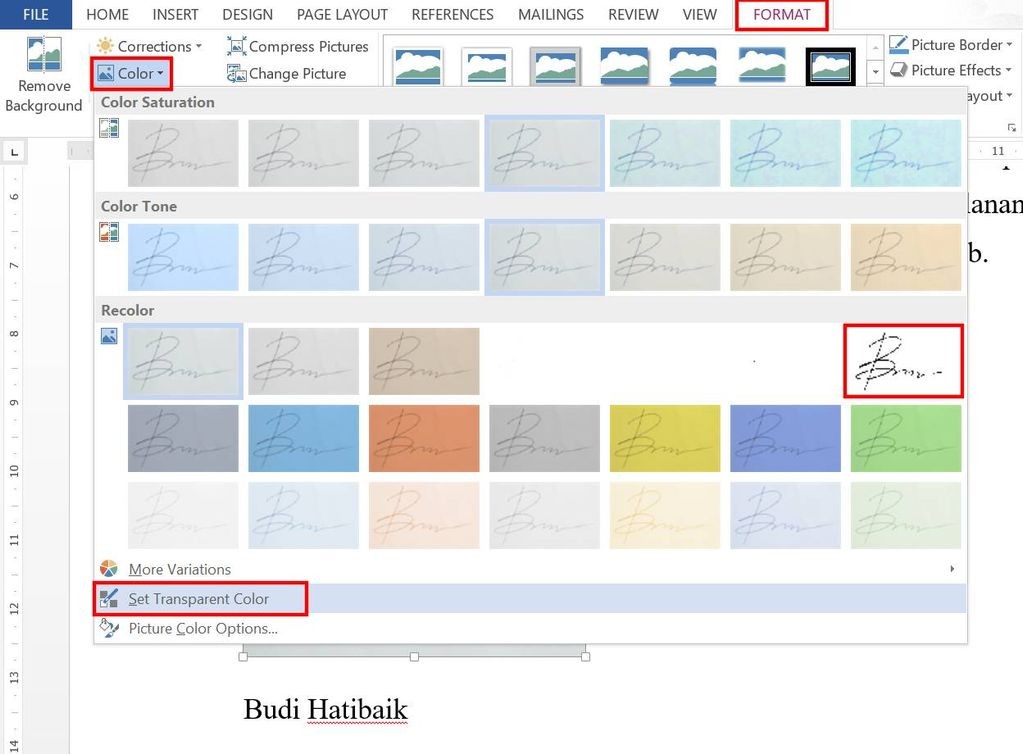
Within the ‘Picture Format’ tab, find the ‘Color’ adjustments. Click on ‘Color’ to see a dropdown menu of color correction options. This is where you’ll refine the colors of your signature to blend seamlessly with your document.
8. Use ‘Set Transparent Color’ to Remove Background
A common issue with scanned signatures is an unwanted background that clashes with the document’s white background. To fix this and make your signature look more professional and scanned directly onto the page, you need to remove the background. Select ‘Set Transparent Color’ from the ‘Color’ dropdown menu. Then, click on the background of your signature image. This will make the background transparent, allowing the signature to blend seamlessly with the document.
If ‘Set Transparent Color’ doesn’t provide the desired result, or for finer control, you can also explore the ‘Recolor’ options within the ‘Color’ menu. Selecting ‘Black and White’ or adjusting the contrast can further refine the signature’s appearance, making it look more like a genuine part of the document, similar to a stamp.
9. Adjust Layout and Position of Your Signature
With the background transparent, the final step is to adjust the layout and position of your signature. Click on the signature image, and a layout options icon (resembling a horseshoe) will appear. Click this icon to explore various text wrapping options. You can choose to place the signature ‘In Line with Text’, ‘Square’, ‘Tight’, ‘Through’, ‘Top and Bottom’, or ‘Behind Text’ and ‘In Front of Text’. Experiment with these options to find the best placement for your signature within the document, whether you need it to float freely or align precisely with text. Adjust the size and drag the signature to the perfect spot.
Read also: Top Microsoft Word Tips and Tricks to Boost Your Productivity
Saving Your Signature for Future Use in Word
To save time in the future, you can store your signature directly within Word for quick access. This is especially useful if you frequently need to sign digital documents. Here’s how:
1. Select Your Inserted Signature Image
Click on the signature image you’ve already inserted and formatted in your document.
2. Go to ‘Insert’ and then ‘Quick Parts’
In the Word menu, navigate back to the ‘Insert’ tab. This time, find and click on ‘Quick Parts’. This feature allows you to save frequently used content for easy reuse.
3. Choose ‘Save Selection to Quick Part Gallery’
In the ‘Quick Parts’ dropdown menu, select ‘Save Selection to Quick Part Gallery…’. This option will save your selected signature image to the Quick Parts gallery.
4. Name Your Signature in ‘Create New Building Block’
A ‘Create New Building Block’ dialog box will pop up. Here, you need to name your signature. Enter a descriptive name in the ‘Name’ field, such as “My Signature” or “Professional Signature,” so you can easily identify it later.
5. Change ‘Gallery’ to ‘AutoText’
In the same ‘Create New Building Block’ dialog box, look for the ‘Gallery’ dropdown menu. Change the selection from ‘Quick Parts’ to ‘AutoText’. Choosing ‘AutoText’ makes your signature even more easily accessible.
6. Click ‘OK’ to Save
Finally, click ‘OK’ in the ‘Create New Building Block’ dialog box. Your signature is now saved as an AutoText entry. To use it in the future, simply type the name you gave it (e.g., “My Signature”) in any Word document and press Enter, and your saved signature will appear.
Take a course: Microsoft Office for Professionals (Microsoft Excel, PowerPoint, and Word)
Inserting a Signature in Word from Your Phone
For those who prefer working on mobile devices, you can also insert a signature directly from your smartphone using the Word app. Here’s how:
1. Open Your Document in the Word App
Open the Word document you need to sign using the Microsoft Word app on your phone.
2. Tap the ‘Pencil’ Icon to Edit
Tap the ‘pencil’ icon, usually located at the top of the screen. This will enable editing mode in the Word app.
3. Access the ‘Insert’ Menu
Tap the upward-pointing arrow icon, typically found above the keypad. This action will expand the menu options.
4. Switch from ‘Home’ to ‘Insert’
In the expanded menu, you’ll see ‘Home’ as the default tab. Tap on ‘Home’ and switch to the ‘Insert’ tab from the dropdown menu.
5. Select ‘Pictures’
Under the ‘Insert’ tab, find and tap ‘Pictures’. This will allow you to insert an image from your phone’s photo library, including your signature file.
6. Insert Your Signature File
Locate your signature image file in your phone’s gallery and select it. The signature will be inserted into your Word document.
7. Adjust Signature Position
Once inserted, you can tap and drag the signature to position it correctly. Use your fingers to resize it as needed. The mobile Word app offers similar layout options as the desktop version, allowing you to adjust how the signature interacts with the text.
Read Also: 7 Easy and Free Ways to Edit PDFs Online!
Creating a Digital Signature Line
Sometimes, documents require a signature line along with the signature. Word allows you to easily create this digital signature line. Here’s how:
1. Select ‘Signature Line’ under the ‘Insert’ Menu
Go to the ‘Insert’ tab in the Word menu. Look for the ‘Text’ group, and within it, find and click on ‘Signature Line’. Selecting ‘Signature Line’ provides a structured way to add a signature placeholder.
2. Fill in Details in the ‘Signature Setup’ Box
A ‘Signature Setup’ box will appear. Fill in the requested information, including ‘Suggested Signer’, ‘Suggested Signer Title’, and ‘Suggested Signer E-mail Address’. These fields help provide context for the signature.
3. Click ‘OK’ to Create the Signature Line
After filling in the necessary details, click ‘OK’. Word will insert a signature line with placeholders for the name, title, and date. You can then place your digital signature image above or on this line for a professional look.
That’s it! You now know how to create and insert signatures in Word, making them look realistically scanned and integrated into your documents. No more worries when you need to sign documents digitally. And if you’re looking to enhance your skills further, especially for career advancement, visit Skill Academy. Skill Academy offers a wide range of courses with specific and in-depth materials to upgrade your abilities. Don’t wait, let’s upgrade your skills today!