
Barcodes are everywhere, from the products we buy in stores to tracking packages. These machine-readable representations of data, visualized as lines and spaces, streamline processes across industries. If you’re looking to generate barcodes for inventory management, product labeling, or any other application, Microsoft Excel offers a surprisingly simple method. This guide will walk you through creating scannable barcodes directly within your Excel spreadsheets.
Excel, while primarily known for data analysis and organization, can be enhanced to create barcodes using readily available barcode fonts. This method is a cost-effective and efficient way to generate barcodes without needing specialized software. Let’s explore how you can transform your data into scannable barcodes in Excel.
Steps to Create Barcodes in Excel
The process involves installing a barcode font and applying a simple formula to your data within Excel. Here’s a detailed breakdown:
1. Install a Barcode Font on Your System
Before you can create barcodes in Excel, you need to equip Excel with barcode fonts. Numerous websites offer barcode fonts, many of which are free for personal or commercial use.
A popular and freely available option is the “3 of 9 Barcode” font. You can download it from various font websites. A quick web search for “3 of 9 Barcode font download” will lead you to resources like dafont.com, a site mentioned in the original article, or other reputable font providers.
2. Install the Downloaded Font
Once you’ve downloaded the barcode font, it typically comes in a zipped folder.
- Unzip the Download: Locate the downloaded ZIP file and extract its contents.
- Install the Font: Inside the extracted folder, you’ll find the font file (often with a .ttf or .otf extension). Double-click on the font file. This will open a font preview window. Click the “Install” button at the top of the window to install the font on your Windows system. For macOS, double-clicking the font file opens Font Book, where you can click “Install Font”.
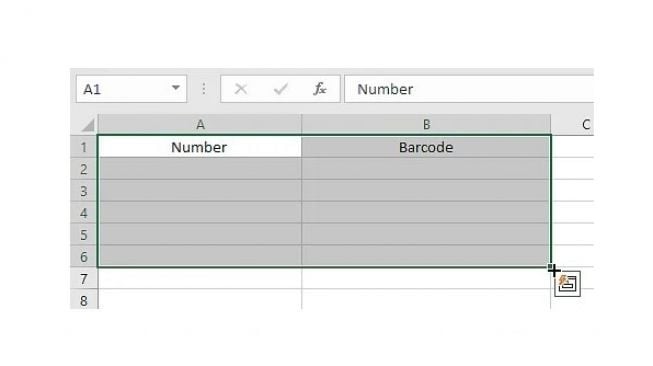
3. Open Microsoft Excel and Prepare Your Data
After installing the barcode font, launch Microsoft Excel and open a new or existing spreadsheet.
- Enter Your Data: In the first column (e.g., column A), enter the data you want to convert into barcodes. This could be product codes, inventory numbers, or any string of characters you need to encode.
- Set Data Type to Text: It’s crucial to format the column containing your data as “Text”. This ensures that Excel treats the entries as text strings and not as numbers or dates, which is essential for accurate barcode generation. To do this, select the column, right-click, choose “Format Cells,” go to the “Number” tab, and under “Category,” select “Text.” Click “OK.”
4. Write the Barcode Formula
Now, you’ll use a formula to prepare your data for barcode conversion.
- Enter the Formula: In the cell adjacent to your first data entry (e.g., cell B2, if your data starts in A2), enter the following formula:
="*"&A2&"*"- Explanation: This formula adds asterisks (*) before and after the text in cell A2. The asterisks act as start and stop characters for many barcode fonts, ensuring the barcode scanner can properly read the code.
- Apply the Formula to the Column: Once you’ve entered the formula in the first cell (B2), drag the fill handle (the small square at the bottom-right corner of the selected cell) down to apply the formula to all the cells in column B, corresponding to your data in column A.
“&A2&”“` entered in cell B2, highlighted to show formula application.
5. Apply the Barcode Font
The final step is to change the font of the formula column to the barcode font you installed.
- Select the Formula Column: Select the entire column where you entered the formula (e.g., column B).
- Change the Font: Go to the “Home” tab in the Excel ribbon, and in the “Font” group, open the font dropdown menu. Scroll through the list and find the “3 of 9 Barcode” font (or whichever barcode font you installed). Select it.
You will now see your data transformed into barcodes in column B, next to your original data in column A.
Benefits of Creating Barcodes in Excel
Using Excel to create barcodes offers several advantages:
- Cost-Effective and Rapid: This method is inexpensive, leveraging free barcode fonts and readily available Excel software. It’s also a quick way to generate barcodes, especially for small to medium-sized businesses or individual projects.
- Easy Product Cataloging: Creating barcodes in Excel simplifies the process of generating product catalogs and lists. You can easily link product information to barcodes within your spreadsheets.
- Simplified Inventory Tracking: Barcodes generated in Excel can be used for inventory management, enabling easy tracking of stock levels and movements.
- Manageable UPC and Product Codes: Excel makes it straightforward to manage and print UPC codes and other product identification numbers in barcode format.
Alternatives to Excel for Barcode Generation
While Excel provides a convenient method, dedicated barcode generator tools offer more advanced features and customization options. Some alternatives mentioned in the original article include:
- Barcode.tec: An online barcode generator.
- Bartender Software: Professional barcode creation and label design software.
- Cognex: Offers industrial barcode readers and software solutions.
- POSGuys: Provides barcode scanners and point-of-sale systems.
These tools may be more suitable for high-volume barcode generation or applications requiring specific barcode symbologies and advanced features.
Conclusion
Creating scannable barcodes in Excel is a practical and accessible solution for various needs, from managing inventory to creating product labels. By following these simple steps to install a barcode font and apply a basic formula, you can quickly turn your Excel data into functional barcodes, enhancing efficiency and organization in your workflows. Start leveraging the power of barcodes in your spreadsheets today!
