
Camo makes it straightforward to enhance your video presence, transforming your webcam or connected camera experience in just a few simple steps, from initial download to engaging in meetings, streaming, or recording. If you intend to use your phone as your camera, you’ll also need the Camo Camera app on your iOS or Android device. This guide will walk you through each step to get you set up. While this guide helps improve your video setup, it’s important to note that it does not cover topics like Cara Login Whatsapp Web Tanpa Scan Barcode Work 2019. Let’s focus on getting your video quality optimized with Camo.
Installing Camo Studio on your PC or Mac
The first step involves setting up Camo Studio on your computer:
Installing on Windows
To install Camo Studio on Windows, you can access it via the Microsoft Store, or directly download it. If you download directly, locate the installer in your Downloads folder and double-click to begin the setup on your Windows PC.
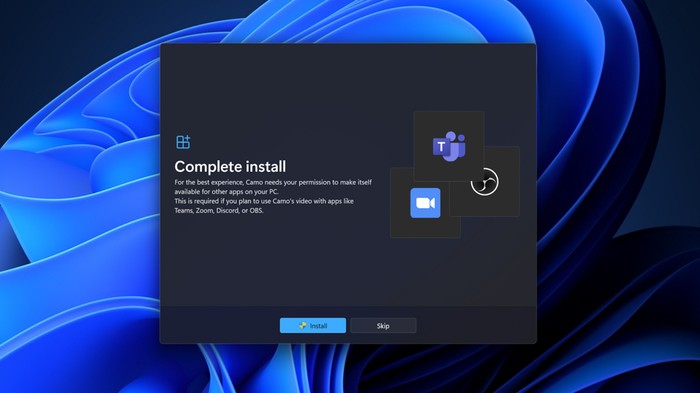
Once installed, open Camo Studio and follow the onboarding process. This introduction will guide you through the app’s features and prompt you to install a compatibility add-on if it’s not already installed.
Alt text: Camo Studio requests user permission for compatibility during Windows installation.
With Camo Studio now installed, the next step is to connect your preferred video input device, whether it’s your built-in camera, a USB webcam, your smartphone, or a professional DSLR or mirrorless camera, as detailed in the device connection section.
Installing on macOS
For macOS users, download Camo Studio for macOS. After downloading, unzip the file and double-click the Camo icon to start the installation. You’ll be asked to grant installation permissions. Once granted, the app will move to your “Applications” folder and install a plugin that enables video conferencing applications to recognize and utilize Camo’s video feed.
Alt text: Camo Studio plugin installation prompt on macOS, ensuring compatibility with video applications.
Alt text: Camo Studio requests service reload on macOS after successful plugin setup.
Follow the on-screen instructions provided by the installer to complete the setup on macOS. After installation, you are ready to connect your camera devices and begin enhancing your video quality.
Connecting Your Devices to Camo Studio
Camo is versatile and compatible with virtually any camera device that can connect to your computer. It also offers wireless pairing with iPhones and Android devices, providing flexibility in your setup:
Using Camo with a Webcam
After installing Camo Studio on your computer, built-in cameras should be automatically detected. They will appear in the “Device” dropdown menu located in the upper left corner of the Camo Studio interface. USB webcams, once connected, will also be listed here. To activate your webcam, simply select it from the dropdown menu. A live preview of the video feed should then appear in the center of the Camo Studio window, confirming the connection.
Using Camo with a DSLR or Mirrorless Camera
Camo provides robust support for both mirrorless and DSLR cameras. It’s important to note that some cameras may require you to enable USB streaming in their settings before they can be recognized by Camo Studio. After enabling USB streaming on your camera and connecting it to your computer, it should appear in the Device dropdown menu in the Camo Studio interface. Selecting your DSLR or mirrorless camera from this menu will activate it as your video source in Camo.
Using Camo with an iPhone
To leverage the high-quality camera on your iPhone with Camo Studio, you need to install the iOS Camo Camera app. Download it from the App Store or by searching for “camo” in the App Store. This app is also compatible with iPads.
If you happen to download the mobile app before installing the desktop version, Camo offers a convenient feature to send the Camo Studio download link directly from your phone to your computer.
- For iOS to macOS sharing, use AirDrop to send the desktop app to your Mac by tapping the AirDrop icon on the Getting Started screen within the Camo app.
- For sharing to Windows, tap the
Send Linkoption also found on the Getting Started screen.
Alt text: Camo app on iPhone displays instructions for desktop download via link sharing.
You can establish a connection between Camo Camera on your iPhone and Camo Studio via either Wi-Fi or USB. For the initial setup, a USB connection is recommended due to its lower video latency and more stable performance. Further details on the advantages and disadvantages of each connection type can be found in the trade-offs between Wi-Fi and USB connections article.
Connecting Camo on iOS over USB
Connecting your iPhone to Camo Studio using a USB cable is a straightforward process on both macOS and Windows. Simply connect your iPhone to your computer using a standard Lightning or USB-C cable. Within moments, video from your iPhone should appear in Camo Studio, indicating a successful USB connection.
Connecting Camo on iOS over Wi-Fi
Setting up a Wi-Fi connection between your iPhone and Camo Studio is also simple, with minor differences between macOS and Windows:
- On a Windows computer, open Camo Studio and click the
+button next to theDevicedropdown in the left sidebar. This action will open a pairing window displaying a QR code. On macOS, selectPair a devicefrom the device dropdown menu. - Open the Camo Camera app on your iPhone, tap the wireless connection button located in the top-right corner, and then use your phone to scan the QR code displayed on your computer screen.
- Your devices should automatically establish a connection, and the video feed from your iPhone should begin streaming into Camo Studio wirelessly.
Wi-Fi pairing for Apple devices requires a minimum of macOS Catalina (10.15, released in 2019) and iOS 13 (released in 2019). All supported versions of Windows are compatible with Wi-Fi pairing.
If you experience any difficulties pairing your devices over Wi-Fi, consult the troubleshooting tips for solutions, or consider using a USB connection as an alternative.
Using Camo with an Android Device
To use your Android device’s camera with Camo Studio, you’ll need to download the Camo Camera app from the Google Play Store. Alternatively, search for “camo” directly within the Google Play Store on your device.
Alt text: Camo app onboarding screen on Android, guiding users through initial setup.
Similar to iOS, if you’ve installed the mobile app before the desktop application, you can send the Camo Studio download link to your computer directly from Camo on your Android device. Simply tap Send Link on the Getting Started screen in the mobile app.
Connecting your Android device to Camo Studio can be done via Wi-Fi or USB. For the initial connection, USB is recommended for its superior stability and lower latency. Further details on the advantages and disadvantages can be found at the trade-offs between Wi-Fi and USB connections.
Connecting Your Android Device to Camo Studio over USB
The process for connecting your Android device via USB varies slightly depending on whether you are using a Windows PC or a Mac.
On macOS, your Android device should connect automatically over USB. If your Android device has previously been paired with a Windows computer, ensure that USB debugging is turned off. You can do this by searching for Developer Options → USB debugging and unchecking the box.
To connect an Android device to Camo Studio on Windows, USB debugging needs to be turned on. The specific steps to enable USB debugging can differ based on your Android phone model. The process for a OnePlus Nord 2 is outlined below as an example.
If you require assistance turning on USB debugging for your specific Android device, please contact us for personalized guidance.
Steps to turn on USB debugging:
- Connect your Android phone to your computer and open Camo Studio. The Camo Studio interface should display instructions similar to those shown in the image below.
- Follow these steps on your Android device to configure USB debugging:
- Go to
Settings, search forBuild number, and tap it 7 times to enable Developer options. - Next, search for
Developer OptionsinSettings, scroll down toUSB debugging, and toggle it on. - If prompted, selecting
Always allow from this computerwill ensure you only need to complete this process once for this computer.
- Go to
Alt text: Android phone showing USB debugging settings under Developer Options on a OnePlus Nord 2.
If you are using an Android device and connecting to a Windows computer, Wi-Fi pairing is generally easier due to the more complex USB pairing process in this scenario.
For more information, refer to the trade-offs between Wi-Fi and USB connections.
Pairing Your Android Device to Camo Studio over Wi-Fi
Pairing your Android device with Camo Studio via Wi-Fi mirrors the iOS process and is straightforward, with minor variations between macOS and Windows:
- On a Windows computer, launch Camo Studio and click the
+icon next to theDevicedropdown in the left sidebar. This will open a QR code pairing window. On macOS, selectPair a devicefrom the device dropdown menu. - In the Camo Camera app on your Android device, tap the wireless connection button at the top-right and scan the QR code displayed on your computer screen.
- Your devices should automatically connect, and video from your Android device will begin streaming to Camo Studio.
Wi-Fi pairing on Apple computers requires macOS Catalina (10.15, released in 2019) or later. All supported versions of Windows and Android are compatible with Wi-Fi pairing.
Should you encounter any issues with Wi-Fi connections, consult the troubleshooting tips or opt for a USB connection.
Utilizing Camo’s Video Features
Once your device is connected and its video is visible in the Camo interface, you can easily refine and customize the video, record footage, or connect to various video meeting platforms. Here’s a quick guide to get started.
Instant Video Enhancements
Exploring all of Camo’s features is encouraged to fully optimize your video. However, for quick and impactful improvements, consider these features:
- To soften your background, activate Portrait mode under Image enhancements in the top right of Camo Studio. Adjust the blur intensity using the provided slider.
- To subtly enhance your presence, enable Spotlight, located below the background modes. Use the slider to control the effect strength; even a slight adjustment can be effective.
- If your video appears too warm (yellowish) or too cool (bluish), adjust the color temperature using the White balance control under Image adjustments on the right.
- For colors that seem oversaturated or undersaturated, use the Saturation and Vibrance sliders under Image adjustments. Vibrance is especially useful for boosting color richness while maintaining natural skin tones.
Combining a few minor adjustments within Camo Studio can significantly enhance your video quality instantly. After you are satisfied with your video’s look, you can use the Overlay tool to add personal details like your name or logo, use the Framing tool to adjust your shot, and save these settings as a preset for future use. You are now set to record or go live with improved video.
Recording Your First Video
Recording with Camo is consistent across macOS and Windows. Simply click the Record button located at the top right of the Camo Studio preview window. Camo will start recording video and save it to your specified location, which you can configure using the arrow adjacent to the record button. To stop recording, click the same button again. The recording will cease and the file will be saved.
Alt text: Camo Studio record button highlighted for initiating video recording.
Connecting to Meeting Platforms
To use Camo for online meetings and presentations, open your preferred video conferencing application and select Camo Camera as your video source in the application’s video settings. You can also select Camo as an audio source, allowing you to use your connected phone’s microphone or to help synchronize audio and video.
To fully understand and utilize Camo’s extensive capabilities, refer to the comprehensive manual. Additionally, a series of guides are available to further enhance your video presence, offering tips on improving audio capture, optimizing lighting, maintaining better eye contact, phone mounting techniques, and more.
Upgrading to Camo Pro
While Camo is fully functional in its free version, offering all essential features to use your phone as a high-quality webcam, Camo Pro unlocks the full potential of your devices, including 4K resolution support. To upgrade, click the “Upgrade” button at the top-right of Camo Studio.
This will display an upgrade window with options to buy or activate a license. Clicking “Buy now” will redirect you to Camo’s checkout page to purchase a license.
Alt text: Camo Studio upgrade window prompting users to explore pro features.
After purchasing Camo Pro, you will receive an email with activation instructions. To activate Camo Pro using your account details, go to Upgrade in Camo Studio, select Activate license, and enter your account credentials.
Alt text: Camo Studio activate license window requesting user credentials for pro activation.
If you have closed the browser window after purchase and cannot locate the activation email, search your inbox and spam folders for emails from [email protected]. If you encounter any difficulties or need assistance, please contact us for support.