
Navigating your TCL TV settings is essential to optimize your viewing experience. Whether you’re looking to fine-tune the picture quality, adjust the audio for immersive sound, manage your channels, or configure system preferences, understanding your TV settings menu is key. This guide will walk you through each section, providing step-by-step instructions to customize your TCL TV to your exact needs.
To access the TV settings menu, simply press the dedicated settings button on your TCL TV remote.
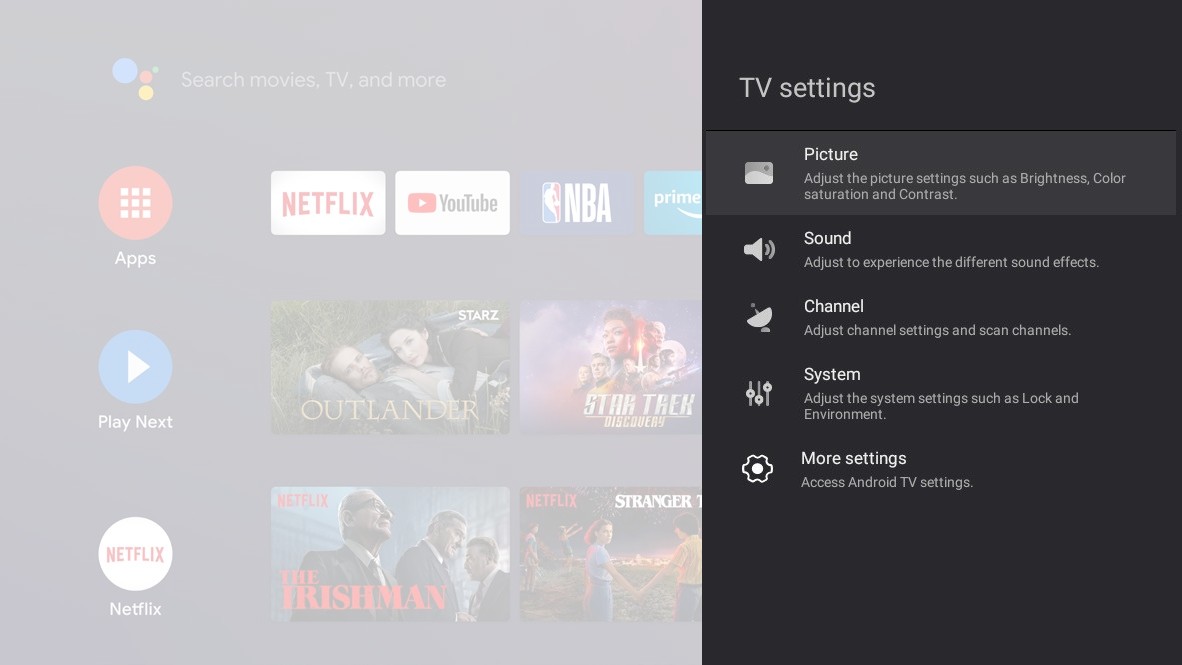
Once you’ve pressed the settings button, the TV settings menu will appear on your screen. Use the directional buttons (▲/▼) on your remote to navigate through the menu options. Select your desired category and press OK or the right directional button (►) to enter the corresponding sub-menu.
Within the sub-menus, utilize the ▲/▼ buttons to browse through the available options. To make adjustments, select an option and press OK or ► to access adjustment interfaces, option lists, or further sub-menus.
To go back to the previous menu level, press the ↶ button. When you’re finished adjusting settings and want to exit the menu, simply press the settings button again or the EXIT button on your remote.
Alternatively, you can also access the TV settings by pressing the HOME button (often represented by a house icon) on your TCL remote, then navigating to TV settings and pressing OK. Keep in mind that some settings might be unavailable depending on the current input source you are using.
Picture Settings
The picture settings menu allows you to customize the visual output of your TCL TV. These settings are adaptable for different broadcasting types and input sources, ensuring optimal picture quality no matter what you’re watching.
- Press the Settings button on your TCL TV remote, navigate to Picture, and press OK.
- Use the ▲/▼ buttons to select the specific picture item you wish to adjust and press OK.
- Adjust each picture item to your personal preferences.
Remember that the options available may vary depending on the picture mode you have selected.
Here’s a breakdown of the key picture settings:
- Picture preset: Choose from pre-configured picture modes optimized for various viewing scenarios. Use ▲/▼ to cycle through options like Standard, Dynamic, Movie, Sports, etc., and press OK to select.
- Brightness: Control the overall luminance of the screen. Use the ◄/► buttons to increase or decrease the brightness level.
- Color saturation: Adjust the intensity of colors in the picture. Use the ◄/► buttons to fine-tune the color saturation to your liking.
- Advanced settings: Dive deeper into picture customization with advanced options:
- Brightness settings: Further adjust Contrast and Black level for enhanced detail in shadows and highlights.
- Color: Fine-tune Color saturation and Tint for accurate and vibrant colors.
- Clarity: Control Sharpness and reduce Digital noise reduction to optimize picture clarity and detail.
- Screen settings: Adjust the Screen mode to fit the content to your screen, such as choosing between different aspect ratios.
- Apply all picture mode: Decide whether to apply your current picture settings to only the current input source or across all input sources. Use ▲/▼ to select your preference and press OK.
- Picture reset: Revert all picture settings back to their factory defaults. Select OK and press OK again to confirm the reset.
Sound Settings
The sound settings menu is designed to help you achieve the best possible audio output from your TCL TV, optimizing sound for different content and listening environments. Like picture settings, sound settings can be adjusted for each broadcasting type and input source.
-
Press the Settings button on your remote, navigate to Sound, and press OK.
-
Use the ▲/▼ buttons to select the sound item you want to adjust, and press OK.
-
Customize each sound item to your preferred settings.
Here’s a look at the key sound settings:
- Sound preset: Select from optimized sound modes for various content types. Enter the Sound mode menu and use ▲/▼ to choose from options like Standard, Movie, Music, Sports, etc., then press OK. Select Reset to restore all sound presets to their original factory settings.
- TV placement: Specify the physical placement of your TV to optimize audio output. Use ▲/▼ to select whether your TV is placed on a table stand or wall-mounted, and press OK.
- Audio only: Turn off the TV display and listen to audio only. This mode is useful for listening to music or podcasts. The screen will turn off after approximately 10 seconds. Press any button to turn the screen back on.
- Advanced settings: Explore further sound customization options:
- Menu sounds: Enable or disable sounds when navigating the TV menus with your remote control.
- Balance: Adjust the audio balance between the left and right speakers to compensate for room acoustics or personal preferences.
- Auto Volume control: Automatically smooth out volume fluctuations, preventing sudden loud sounds and ensuring consistent audio levels.
- Digital audio out: Choose the digital audio output format (e.g., PCM, Auto, Passthrough) depending on your external audio system’s capabilities.
- Digital audio out delay: Correct potential timing issues between audio and video, especially when using external audio systems. This option is typically available when Digital audio out is set to PCM.
Channel Settings
The channel settings menu is your control center for managing TV channels. This is where you can perform channel scans, organize your channel list, and access the Electronic Program Guide (EPG). These settings are primarily relevant when you are using the TV mode to watch broadcast channels.
-
In TV mode, press the Settings button on your remote, select Channel, and press OK.
-
Use the ▲/▼ buttons to select the channel item you wish to configure, and press OK.
-
Adjust each channel setting according to your needs.
Key channel settings include:
- Channel scan: Search for available channels automatically or manually. This feature is essential for tuning your TV to receive broadcast signals.
- Country/Region: Set your country or region to ensure your TV scans and arranges channels according to local broadcasting standards. You may need to enter a password (default is 1234) if parental controls are enabled.
- Automatic search: Initiate an automatic channel scan. Select Automatic search and press OK. You can then configure tuner mode and other options before starting the scan by pressing Search and OK. This is the most common way to scan for channels.
- Manual scan: Manually tune to specific channels by entering channel numbers or frequencies. This is useful for fine-tuning reception or adding specific channels.
- Channel organizer: Edit your channel list after an automatic scan. Rearrange channels, mark favorites, or skip channels you don’t want to see.
- Clean channel list: Reset your channel list, deleting all saved channels.
- EPG (Electronic Program Guide): Access the on-screen program guide, providing information about current and upcoming TV programs.
- Channel diagnostics: Run tests to check your TV’s picture, sound, and signal strength for channel reception.
- Time shift: Enable or disable the time shift function, which allows you to pause, rewind, and fast-forward live TV.
System Settings
The system settings menu provides options to configure the overall system behavior of your TCL TV, including parental controls, connectivity features, and general preferences.
-
Press the Settings button on your remote, select System, and press OK.
-
Use the ▲/▼ buttons to select the system option you want to adjust, and press OK.
-
Customize each system option to your liking.
Key system settings include:
- Parental Controls (formerly Lock): Set up restrictions to manage content access for children. You’ll need to create a four-digit password to activate parental controls. This password will be required to view restricted programs. The default password is 1234.
- TLink (HDMI CEC): Utilize HDMI Consumer Electronics Control (CEC) to control connected devices with your TV remote. This can potentially allow you to use your TCL TV remote to control your DVD player and other compatible devices connected via HDMI.
- Auto power on: Enables your TV to automatically power on when you turn on a connected CEC device, such as a DVD player, using the device’s remote.
- Auto Standby: Allows all connected CEC devices to automatically enter standby mode when you turn off your TV with the TV remote.
- Game mode: Optimize your TV for gaming by reducing input lag. Toggle this feature on or off by pressing OK.
- Environment: Select the environment where your TV is used (e.g., Home, Shop) to adjust picture and sound settings accordingly.
- Advanced settings: Access further system customization options:
- LED indicator: Configure the LED indicator light behavior when the TV is in standby mode (Flashing, Off, or On).
By mastering these TCL TV settings, you can tailor your television to deliver the best possible entertainment experience, optimizing picture, sound, channel access, and system functionality to perfectly suit your preferences.