For car detailing enthusiasts and professionals alike, achieving flawless results often hinges on precision and customization. While the Brother ScanNCut might be known in crafting circles, its utility extends far beyond quilting and paper crafts. This innovative machine can be a game-changer in your detailing toolkit, specifically when it comes to creating custom stencils. Forget generic, pre-made stencils – the Brother ScanNCut empowers you to design and cut intricate stencils tailored to your exact car detailing needs, saving you time and ensuring a professional finish every time.
Whether you’re aiming for crisp lines for paint correction, applying ceramic coatings with pinpoint accuracy, or creating unique designs for vehicle customization, the Brother ScanNCut can revolutionize your approach. Let’s explore how this versatile machine can cut precise stencils from various materials, opening up a new realm of possibilities for automotive detailing.
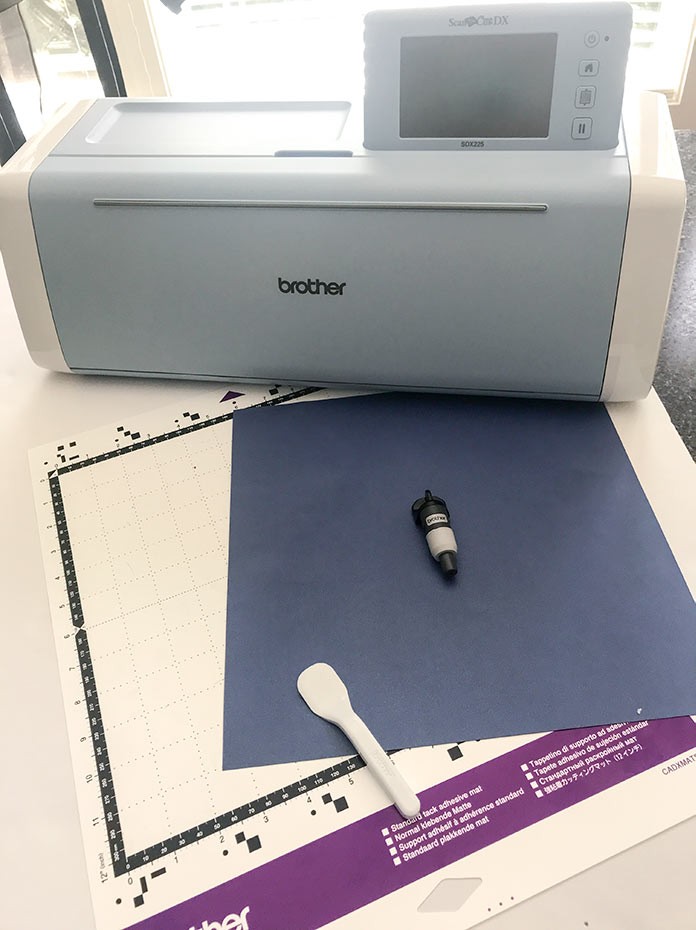
Supplies and Materials for Car Detailing Stencils
To get started with crafting car detailing stencils using your Brother ScanNCut, you’ll need a few key supplies:
- Brother ScanNCut Machine (SDX series recommended): The star of the show, capable of intricate cuts.
- Standard Tack Adhesive Mat: Provides the necessary grip to hold stencil materials securely during cutting.
- Auto Blade or Standard Blade: Ensures clean and precise cuts on various stencil materials.
- Spatula: Helpful for lifting delicate stencils from the mat without tearing.
- Stencil Material: Options include:
- Vinyl: Excellent for paint stencils and temporary designs. Choose appropriate vinyl for stencil making, ensuring it’s not too aggressive and paint-safe for automotive surfaces.
- Mylar or Stencil Film: Durable and reusable, ideal for intricate or frequently used stencil designs and chemical resistant for various detailing products.
- Detailing Tape (for wider area masking if needed): Can be cut into specific shapes for masking larger areas around the stencil.
The Brother ScanNCut’s ability to handle materials up to 3mm thickness opens doors to experiment with various stencil materials beyond paper. Imagine creating stencils from thin plastic sheets for added durability or even crafting custom templates from heat-resistant films for specific detailing processes.
Step-by-Step Guide to Cutting Car Detailing Stencils
Let’s walk through the process of creating a basic stencil using the Brother ScanNCut, adaptable for a range of car detailing applications:
- Select or Create Your Stencil Design: On your ScanNCut machine, navigate to the ‘Pattern’ menu and then ‘Shapes’. You can choose from built-in shapes or import your own designs via USB or wirelessly if your model supports it. For car detailing, consider geometric shapes, lettering for branding, or custom logos.
-
Resize and Adjust Your Design: Modify the size of your chosen shape to fit your detailing project. Consider the area you need to stencil on your vehicle. For intricate designs, ensure the lines are thick enough for the cutter to process cleanly, especially with stencil materials.
-
Maximize Material Usage: Arrange multiple stencils on your digital mat preview to optimize material usage. The ScanNCut allows you to duplicate and arrange shapes efficiently, saving stencil material and time.
-
Prepare Your Material and Mat: Place your chosen stencil material onto the standard tack adhesive mat, ensuring it’s smooth and securely adhered to prevent shifting during cutting.
-
Select ‘Cut’ and Start Cutting: Choose the ‘Cut’ option on your ScanNCut. The machine’s auto blade (or standard blade) will precisely cut your stencil design from the material. Monitor the process to ensure clean cuts, especially for intricate designs.
- Weed Your Stencil: Carefully remove the excess material from around your cut stencil, leaving only the desired design on the backing sheet (if using vinyl) or stencil film. Use a weeding tool or the spatula for intricate parts.
Unleashing Detailing Potential with Custom Stencils
With your custom stencils in hand, the possibilities for enhancing your car detailing work are vast:
- Precise Paint Correction: Create stencils for isolating specific areas during spot paint correction, ensuring targeted and clean results.
- Ceramic Coating Application: Design stencils for applying ceramic coatings in specific patterns or logos, adding a unique touch to your detailing services.
- Wheel Detailing: Cut stencils for wheel stripes, rim designs, or applying protective coatings to specific wheel areas with precision.
- Interior Detailing: Create stencils for fabric protection application in patterned designs or for custom interior accents.
The Brother ScanNCut is more than just a crafting machine; it’s a precision tool that can significantly elevate your car detailing capabilities. By creating custom stencils, you gain unparalleled control, accuracy, and creative freedom, allowing you to deliver truly exceptional and personalized detailing services. Embrace the Brother ScanNCut and transform your detailing process today.