
Encountering the “Epson scan cannot communicate with the scanner” error can be a frustrating roadblock when you need to scan important documents or photos. This issue can arise whether you’re using a USB or network connection for your Epson scanner. Fortunately, resolving this problem is often straightforward with the right troubleshooting steps. This guide will walk you through effective solutions to get your Epson scanner communicating smoothly with your system again.
Troubleshooting USB Connection Issues
When your Epson scanner is connected via USB and you encounter communication problems, follow these steps to diagnose and fix the issue:
Initial Checks for USB Connection
First, you need to access the Epson Scan settings to initiate a connection test.
-
Open Epson Scan Settings. Locate the Epson Scan Settings icon, typically found on your desktop or in your applications menu, and open it. This utility allows you to configure and test your scanner connection.
alt text: Epson Scan Settings icon on a desktop, used to open the scanner configuration utility.
-
Select Your Scanner. In the Epson Scan Settings window, use the drop-down list to choose your Epson product. It’s crucial to select the correct model for accurate testing.
Note: If your scanner isn’t listed, ensure you have installed the correct Epson Scan software for your specific model from the official Epson website. Drivers are essential for your computer to recognize and communicate with the scanner.
-
Test the Connection. Click the Test button within the Epson Scan Settings. This action will attempt to establish communication with your scanner and provide a status result.
Test Result Visual Indicator Successful Test Unsuccessful Test 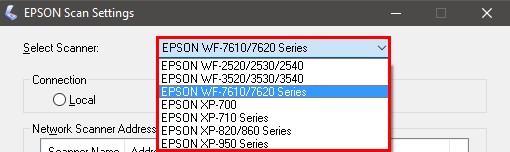


alt text: “Successful Test” dialog box in Epson Scan Settings, indicating successful USB scanner communication.
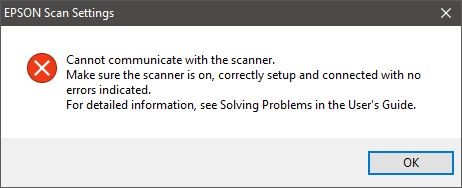
alt text: “Unsuccessful Test” dialog box in Epson Scan Settings, indicating failed USB scanner communication.
Steps After a Successful USB Test
If the test is successful, it means the basic USB communication is working.
- Click OK on the successful test dialog.
- Click OK again to close the Epson Scan Settings window.
- Your Epson scanner should now be ready to scan via the USB connection. Try initiating a scan to confirm.
Steps After an Unsuccessful USB Test
An unsuccessful test indicates a problem with the USB connection or scanner setup. Follow these steps, testing after each, to pinpoint the issue:
-
Power Cycle Your Scanner. Ensure your Epson scanner is powered on. If it’s unresponsive, check the power supply:
- Plug the scanner directly into a wall outlet, bypassing any extension cables or surge protectors, to rule out power delivery issues.
- Try using a different power cable to eliminate the possibility of a faulty cable.
-
Reconnect the USB Cable. Disconnect the USB cable from both your computer and the Epson scanner. Then, firmly reconnect it to both ports. A loose connection is a common cause of communication errors.
-
Try a Different USB Cable. A damaged or incompatible USB cable can prevent proper communication. Test with a different USB cable, if available, to ensure cable integrity.
-
Check Device Manager (Windows). For Windows users, the Device Manager can reveal device conflicts.
- Open Device Manager (search for “Device Manager” in the Windows search bar).
- Look for “Imaging Devices.” Expand this section and find your Epson scanner.
- Ideally, your scanner should appear without any warning icons. A question mark (?), exclamation mark (!), or red X indicates a problem.
- If you see such a mark or the scanner is listed as an “Unknown device,” it often signals a driver issue. Uninstall and then reinstall the Epson Scan software from the Epson website to refresh the drivers.
Troubleshooting Network Connection Issues
If you are using a network connection (Wi-Fi or Ethernet) and are facing communication errors, these steps will guide you through troubleshooting:
Initial Network Setup and Test
Similar to USB, start by accessing Epson Scan Settings and configuring the network connection.
-
Open Epson Scan Settings. Launch the Epson Scan Settings utility.
alt text: Epson Scan Settings application icon, used for configuring scanner settings.
-
Select Your Scanner. Choose your Epson scanner model from the drop-down list. Ensure the correct model is selected for accurate network configuration.
Note: If your scanner is not listed, download and install the Epson Scan software specifically designed for your scanner model from the Epson support website.
-
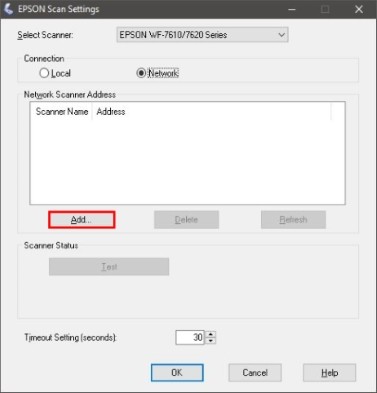
Set Connection Type to Network. In Epson Scan Settings, set the Connection Type to Network to configure for a network connection.
alt text: Network option highlighted in the Connection Type dropdown menu in Epson Scan Settings.
-
Add Your Scanner. Click the Add button to initiate the process of adding your network scanner.
-
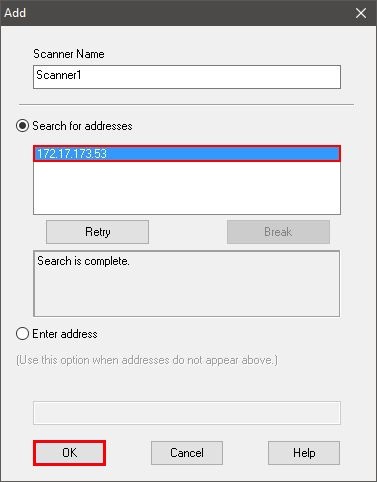
Select or Enter IP Address.
-
If your scanner’s IP address appears in the list, select it and click OK.
-
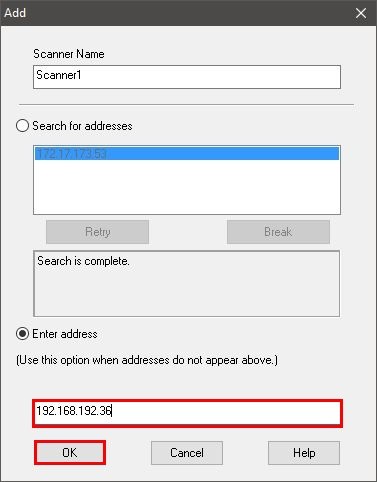
If the IP address is not listed, click Enter Address. You will need to manually enter the IP address of your scanner.
- Type in the IP address of your Epson scanner. You can usually find this in your scanner’s network settings menu or by printing a network status sheet from the scanner.
- Click OK.
-
-
Test the Network Connection. Click the Test button in Epson Scan Settings to check the network communication.
Test Result Visual Indicator Successful Test Unsuccessful Test alt text: “Test Successful” dialog box in Epson Scan Settings, confirming successful network scanner communication.
alt text: “Test Unsuccessful” dialog box in Epson Scan Settings, indicating failed network scanner communication test.
Steps After a Successful Network Test
If the network test is successful:
- Click OK on the success message.
- Click OK to close Epson Scan Settings.
- Your Epson scanner should now be ready for wireless scanning.
Steps After an Unsuccessful Network Test
An unsuccessful network test requires further investigation into network settings and scanner status:
-
Click OK on the unsuccessful test message.
-
Verify Scanner Power. Ensure your Epson scanner is turned on and not in sleep mode.
-
Check Network Configuration. Print a Wi-Fi status sheet directly from your scanner or navigate to the scanner’s network settings via its control panel. Verify the following:
- SSID Confirmation: If using Wi-Fi, confirm that both your computer and the Epson scanner are connected to the same Wi-Fi network (SSID).
- IP Address Verification: Ensure the IP address listed for your scanner in Epson Scan Settings matches the IP address shown on the scanner’s network status sheet or settings.
-
Re-Test the Connection. After verifying the network settings, click Test again in Epson Scan Settings to re-evaluate the connection.
By systematically following these troubleshooting steps for both USB and network connections, you should be able to resolve the “Epson scan cannot communicate with the scanner” error and restore your scanner’s functionality.