
Welcome to carcodepro.com, your trusted resource for automotive repair and 3D scanning techniques. As part of our expert tutorial series, this guide will delve into the Point Cloud Registration algorithm, specifically the Iterative Closest Point (ICP) method. In this practical tutorial, geared towards enhancing your automotive 3D modeling workflow, we will explore how to leverage photogrammetry to colorize a laser scan point cloud using software like 3DF Zephyr. This process is invaluable for automotive professionals seeking precise and visually rich 3D representations of vehicles and parts.
Understanding Point Cloud Registration and ICP
Point cloud registration is a crucial process in 3D scanning, especially when combining data from different sources or viewpoints. Imagine scanning a car with both laser scanners and photogrammetry techniques. Each method captures point clouds, but they might be misaligned, misoriented, and not perfectly scaled relative to each other. This is where point cloud registration comes in. It’s the process of transforming these point clouds into a common coordinate system, ensuring they accurately overlap and represent a single, cohesive 3D model.
The Iterative Closest Point (ICP) algorithm is a widely used method for point cloud registration. ICP works by iteratively refining the alignment between two point clouds – a “source” and a “reference”. It does this by:
- Finding Closest Points: For each point in the source cloud, it finds the closest corresponding point in the reference cloud.
- Estimating Transformation: It then calculates the transformation (rotation, translation, and optionally scaling) needed to best align the source cloud with the reference cloud based on these closest point pairs.
- Applying Transformation: The calculated transformation is applied to the source cloud, moving it closer to the reference.
- Iteration: Steps 1-3 are repeated iteratively until a stopping criterion is met, such as reaching a minimum distance error or a maximum number of iterations.
In the context of automotive applications, ICP is essential for tasks like:
- Combining Laser Scans and Photogrammetry: Integrating high-accuracy laser scan data with the color and texture information from photogrammetry for comprehensive vehicle models.
- Reverse Engineering: Aligning scans of car parts taken from different angles to create complete 3D models for CAD design and manufacturing.
- Quality Inspection: Registering scans of manufactured parts with CAD models to identify deviations and ensure dimensional accuracy.
This tutorial will guide you through using ICP registration within 3DF Zephyr to align and colorize a laser scan point cloud, enhancing your automotive 3D scanning projects.
Step-by-Step Guide to ICP Registration in 3DF Zephyr
For this tutorial, we will assume you have both a laser scan point cloud and a point cloud generated from photogrammetry. 3DF Zephyr is capable of importing various point cloud formats, including native laser scan formats with the appropriate plugins.
Preparation: Importing and Initial Alignment
-
Import Point Clouds: Start by importing your photogrammetry point cloud and your laser scan point cloud into 3DF Zephyr. You can generate a quick point cloud from photos within Zephyr or import an existing one. For the laser scan, you can drag and drop the file (e.g., a
.plyfile likemirandola_laserscan.plyused in the original example) directly into the workspace or use the import menu. When prompted, select “merge”. The laser scan will initially be imported as an unstructured object. -
Rough Alignment using Gizmo: The laser scan point cloud will likely be misaligned in terms of scale, rotation, and position compared to the photogrammetry point cloud. Use the Gizmo tool in 3DF Zephyr to visually and roughly align the two point clouds. This involves manually rotating, translating, and scaling the laser scan point cloud until it approximately overlaps with the photogrammetry point cloud and is of a similar size.
Tip: Object Selection Menu: If you find it difficult to differentiate between the point clouds during manual alignment, use the object selection menu in 3DF Zephyr to ensure you are manipulating the correct point cloud (typically the laser scan, the “moving” object).
-
Confirm Initial Alignment: Once you have achieved a rough visual alignment, click “OK” to confirm the initial transformation. This sets the stage for the precise ICP registration.
Step 1: Running the ICP Registration Wizard
-
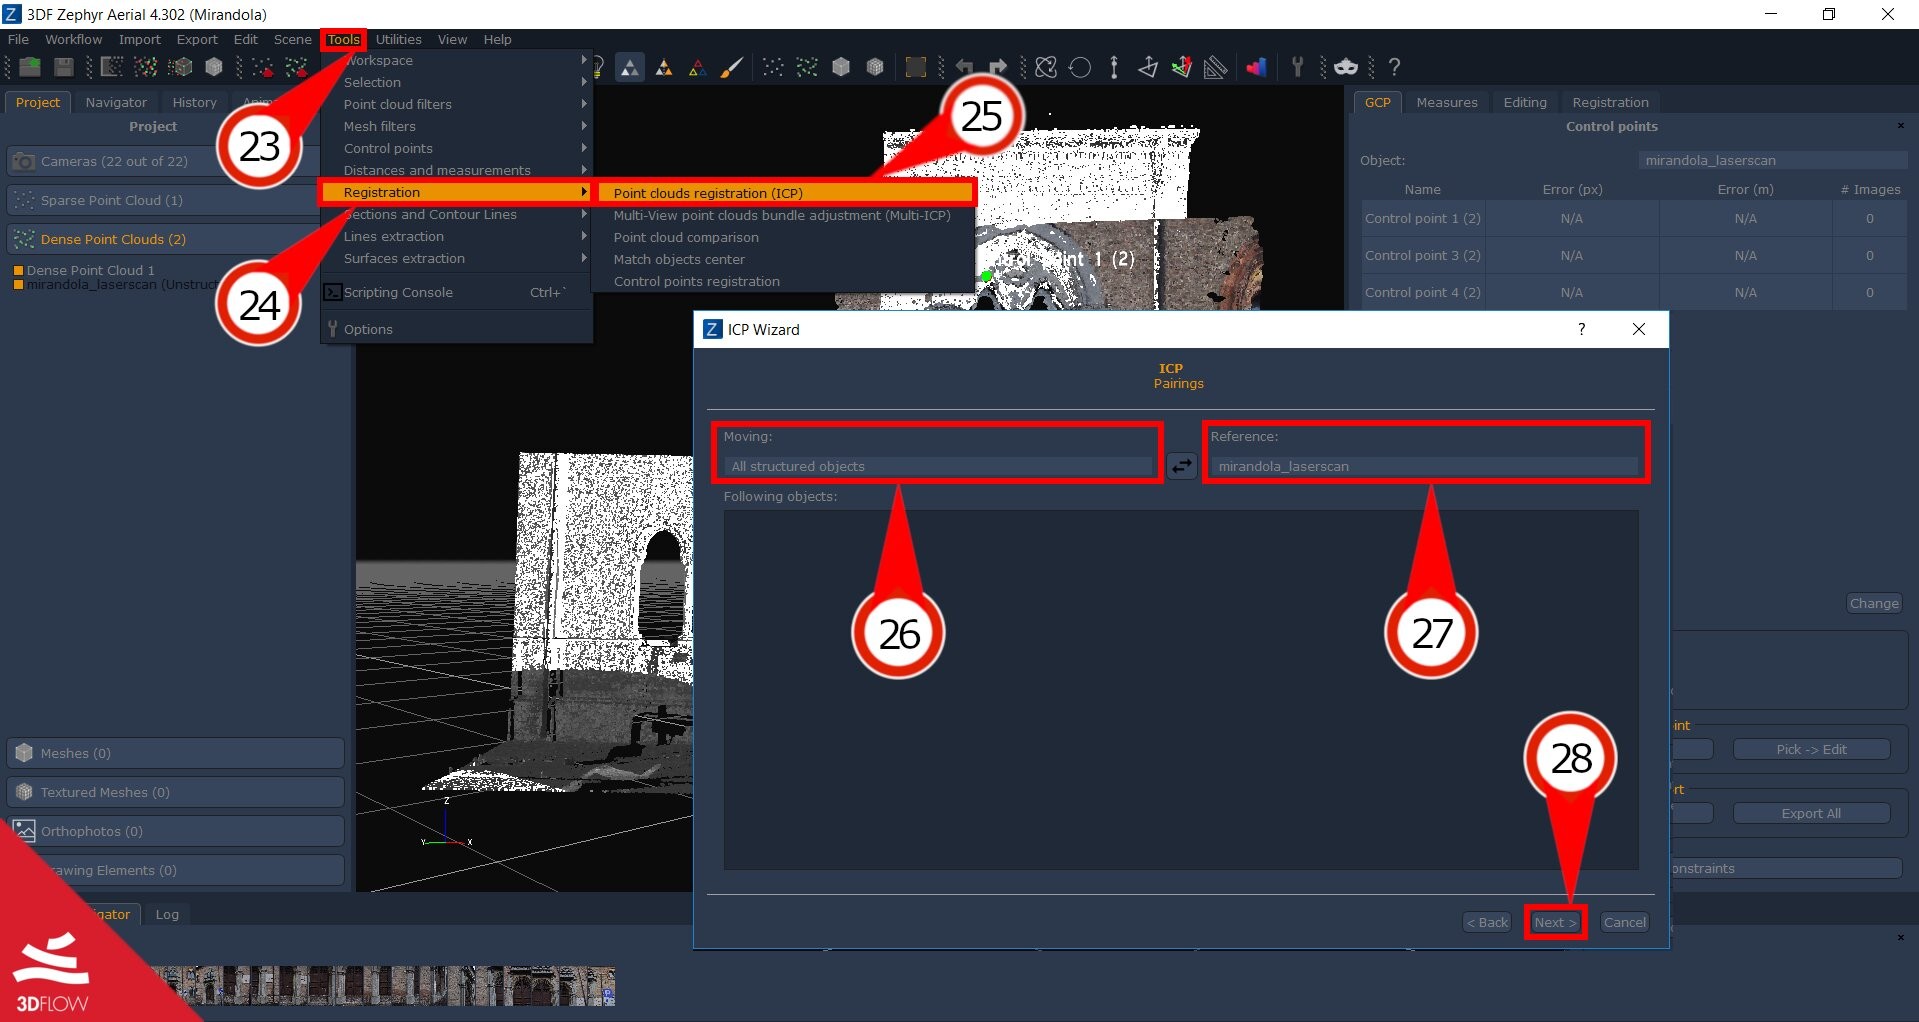
Access ICP Wizard: Navigate to the “Tools” menu in 3DF Zephyr. Select “Registration”, and then choose “Point cloud Registration (ICP)”. This will launch the ICP wizard.
-
Define Moving and Reference Objects: In the ICP wizard, you need to specify which point cloud will be moved (the “Moving” object) and which will remain fixed as the reference (the “Reference” object). Typically, you would choose the laser scan point cloud as the moving object and the photogrammetry point cloud as the reference, especially if the photogrammetry data is georeferenced or considered more spatially accurate. Select the appropriate objects from the dropdown menus in the “Moving” and “Reference” sections of the wizard.
-
ICP Parameters: The next page of the wizard allows you to adjust parameters for the ICP algorithm, such as iteration limits and error thresholds. For most cases, the default settings are sufficient. However, ensure that the “Enable scaling” checkbox is checked. This allows ICP to also refine the scale difference between the point clouds, which is crucial when combining data from different sources. Click “Next” to proceed with the ICP computation.
-
Run ICP Computation: 3DF Zephyr will now execute the ICP algorithm. The computation time will depend on the size and complexity of your point clouds.
-
Residual Histogram: Once the ICP computation is complete, a residual histogram will be displayed. This histogram visually represents the distribution of distances between the registered point clouds. It provides an indication of the quality of the registration. A tighter distribution around lower residual values generally indicates a better registration.
-
Finish ICP Wizard: Click “Finish” to close the ICP wizard. You can access the residual histogram again later through Tools > Registration > Point Cloud Comparison.
Step 2: Making the Point Cloud Structured and Colorized
After successful ICP registration, the laser scan point cloud is now aligned with the photogrammetry point cloud. To leverage the color information from the photogrammetry data and apply it to the laser scan, you need to make the laser scan point cloud structured.
-
Make Structured: Right-click on the “unstructured object” (which is now your aligned laser scan point cloud) in the 3DF Zephyr workspace. Select “make structured”.
-
“Make stereo point cloud structured” Dialog: The “Make stereo point cloud structured” dialog box will appear. In this dialog, ensure that the options to “compute colors” and “compute normals” are selected. 3DF Zephyr will then project the color information from the (presumably already colored) photogrammetry point cloud onto the now-aligned laser scan point cloud during the structuring process. Click “Ok”.
-
Colored and Structured Point Cloud: 3DF Zephyr will process the point cloud and create a new structured point cloud. This new point cloud will be colored based on the photogrammetry data and can be used with all of 3DF Zephyr’s tools for mesh extraction, contour line generation, and other point cloud processing tasks.
Conclusion
Congratulations! You have successfully registered and colorized a laser scan point cloud using the ICP algorithm in 3DF Zephyr. This technique is powerful for combining the strengths of different 3D scanning methods, providing highly accurate and visually rich 3D models for automotive applications and beyond. Experiment with different datasets and explore the advanced features of 3DF Zephyr to further master point cloud processing and enhance your 3D automotive workflows. This structured and colorized point cloud is now ready for advanced applications in automotive design, repair, and analysis.