Digitizing documents has become increasingly essential in our daily lives, whether for professional or personal use. The convenience of having digital copies of important papers is undeniable, offering benefits like easy sharing, organization, and reducing physical clutter. If you’re an iPhone or iPad user, you’re in luck! Apple has seamlessly integrated document scanning capabilities directly into its iOS and iPadOS operating systems through the built-in Notes and Files apps. This guide will walk you through the simple steps to scan documents using your iPhone or iPad, ensuring you can quickly and efficiently digitize your paperwork.
Scanning Documents Using the Notes App
The Notes app on your iPhone and iPad is not just for jotting down quick thoughts; it’s a powerful tool that includes a handy document scanner. Here’s how to use it:
-
Open Notes and Start or Select a Note: Launch the Notes app on your iPhone or iPad. You can either open an existing note where you want to insert the scanned document or create a new note specifically for your scan.
-
Access the Scan Documents Feature: Within your chosen note, look for the Attachment button, which is typically located above the keyboard. Tap this button, and a menu will appear. From this menu, select “Scan Documents”.
Alt text: Scan Documents icon in the Notes app on iPhone, indicating the option to digitize paper documents.
-
Position Your Document: Place the document you want to scan on a flat, well-lit surface. Then, position your iPhone or iPad camera over the document so it is clearly visible on your screen.
-
Capture the Scan: Depending on your settings, your device might be in Auto mode. In this mode, the scanner will automatically detect the document and capture the scan. If you prefer to control the capture manually, tap the Shutter button (the circular button at the bottom) or press either of the Volume buttons.
-
Adjust and Keep the Scan: After capturing the initial scan, you may need to adjust the corners to ensure the scan accurately frames the document. Drag the corners of the highlighted area to precisely fit the page boundaries. Once you are satisfied with the adjustment, tap “Keep Scan”.
-
Save or Add More Pages: You can tap “Save” to finalize the scan if it’s a single-page document. If you have multiple pages to scan, tap “add additional scans” to continue scanning more pages into the same document.
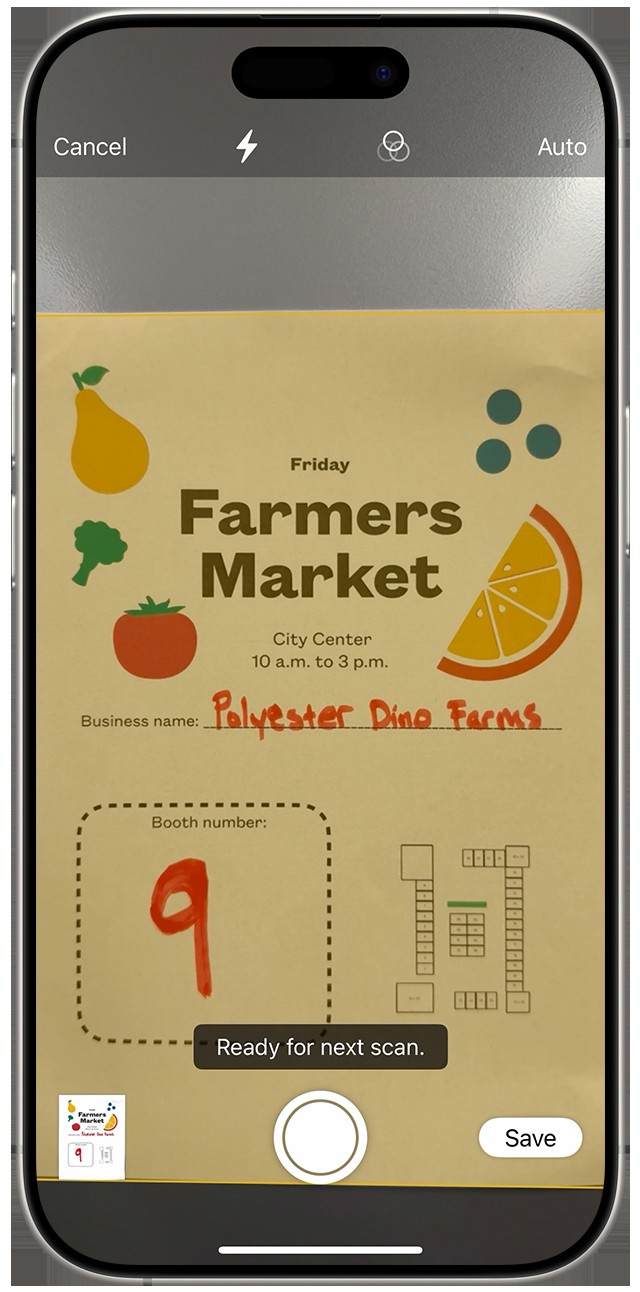 In Notes with iOS, you can scan documents with your iPhone camera.
Alt text: Scanning a multi-page document using iPhone Notes app, displaying the scanned pages and the save button for digital archiving.
You can also quickly access the scan feature within an open note by tapping the More button (usually three dots in a circle) and then selecting “Scan”.
Digitally Sign Documents in Notes
Beyond scanning, the Notes app also allows you to sign documents digitally, streamlining workflows that require signatures. Here’s how to add your signature:
-
Open the Scanned Document: In Notes, open the note containing the document you wish to sign. Then, tap on the scanned document to view it.
-
Access Markup Tools: Tap the Markup button, which looks like a pen icon, usually located at the top right corner of the screen.
Alt text: Markup button in iOS Notes, used to access annotation and signature features for scanned documents.
-
Insert Your Signature: Tap the Add button (often a plus sign +), and then select “Signature” from the options. You can choose a previously saved signature or create a new one.
Alt text: Signature icon within Markup tools in Notes, allowing users to insert digital signatures into scanned documents.
-
Adjust and Place Your Signature: Once your signature is inserted, you can resize the signature box by dragging the corners and move it to the desired location on the document.
-
Finalize and Save: Tap “Done” to save the signed document. Your signature is now digitally embedded into the document.
For manual signing directly on the document, after accessing the Markup tools, simply select a pen or marker tool and use your finger or an Apple Pencil (on compatible iPads) to sign directly on the screen.
Scanning Documents Using the Files App
The Files app offers another convenient way to scan documents on your iPhone or iPad, particularly useful if you intend to manage and organize your scans within your file system.
- Open the Files App: Launch the Files app on your iPhone or iPad.
- Initiate Scan from the More Menu: In the Files app, tap the More button, which is typically represented by three dots in a circle. From the menu that appears, select “Scan Documents”.
- Capture, Adjust, and Save: The scanning process within the Files app is similar to the Notes app. Position your document, let the scanner automatically scan or manually capture it, adjust the corners if necessary, and tap “Keep Scan”.
- Save Your Document: After scanning, tap “Save” to save the document. The Files app will typically save the scanned document as a PDF file, allowing you to choose the save location within your Files structure, such as iCloud Drive or On My iPhone/iPad.
Conclusion
Scanning documents on your iPhone or iPad is a straightforward process thanks to the integrated features in the Notes and Files apps. Whether you need to quickly digitize a receipt, an important contract, or any paper document, Apple provides user-friendly tools to get the job done efficiently. By mastering these simple techniques, you can easily transition to a more paperless lifestyle, keeping your important documents organized and accessible right at your fingertips.