
Is your Anki Overdrive car refusing to scan the track, leaving you stuck in the pit stop instead of enjoying high-speed races? While there could be several reasons why your Anki Overdrive car isn’t cooperating, one often-overlooked culprit is the car’s battery. Like any rechargeable battery, the LiPo batteries in Anki Overdrive cars degrade over time, leading to performance issues that might manifest as problems with track scanning. This guide will walk you through the process of replacing your Anki Overdrive car’s battery, potentially resolving scanning issues and boosting your car’s performance.
While a dead battery might not be the most direct cause of a car failing to scan the track (sensor issues or track cleanliness are more common), a weak or failing battery can certainly contribute to inconsistent performance and unexpected glitches. Think of it this way: the car’s system needs stable power to operate all its functions correctly, including the sensors that read the track. If the battery is struggling to provide consistent power, it could lead to erratic behavior, including problems with track recognition.
This tutorial is for those who are comfortable with DIY repairs and have some basic soldering skills. Please be aware that performing this modification will likely void your warranty, and should be done at your own risk. However, if your car is already out of warranty or you’re looking to breathe new life into a sluggish vehicle, replacing the battery can be a worthwhile project.
Why Battery Issues Can Affect Track Scanning
A degraded LiPo battery in your Anki Overdrive car can lead to a variety of problems, and while “won’t scan track” isn’t always directly caused by the battery, it’s plausible that battery issues can contribute to such problems. Here’s why:
- Inconsistent Power Supply: A failing battery might not deliver a stable and consistent voltage. This can affect the performance of all electronic components in the car, including the optical sensors responsible for reading the track. Fluctuations in power could lead to sensor malfunction or misreading of the track codes.
- Low Voltage Issues: As LiPo batteries age, their capacity diminishes, and they might struggle to maintain the required voltage under load. Insufficient voltage could prevent the car’s systems from operating optimally, potentially affecting the track scanning process.
- Unexpected Shutdowns & Glitches: A weak battery might cause sudden shutdowns or glitches in the car’s electronics. These unpredictable behaviors could manifest as the car failing to scan the track or losing track recognition mid-race.
While cleaning the track and checking the car’s sensors are the first troubleshooting steps for “won’t scan track” issues, considering the battery is a logical next step, especially for older cars or those exhibiting signs of battery degradation like short run times.
Step-by-Step Guide to Anki Overdrive Battery Replacement
This guide will walk you through replacing the battery in your Anki Overdrive car. We’ll cover disassembly, battery removal, and installation of a new, higher-capacity battery to potentially improve performance.
1. Disassembling the Anki Overdrive Car
First, flip your Anki Overdrive car upside down. You’ll see three screws on the bottom. The key is to identify the correct screw – it’s the largest screw located at the front of the car. This is the screw that secures the car’s hood.
Carefully unscrew this larger screw. Once removed, you should be able to gently lift and detach the car’s hood. With the hood off, you’ll gain access to the internal components of the Anki Overdrive car.
Next, you’ll need to detach the Printed Circuit Board (PCB). The PCB is held in place by small latches on each side of the car and hooks at the rear. Gently release these latches to free the PCB.
Important: Be extremely careful when removing the PCB. There are delicate wires connecting the PCB to the motors at the back of the car. Avoid pulling or yanking the PCB, as you could damage these wires. You don’t need to completely detach the PCB; simply lift it enough to access the battery compartment underneath.
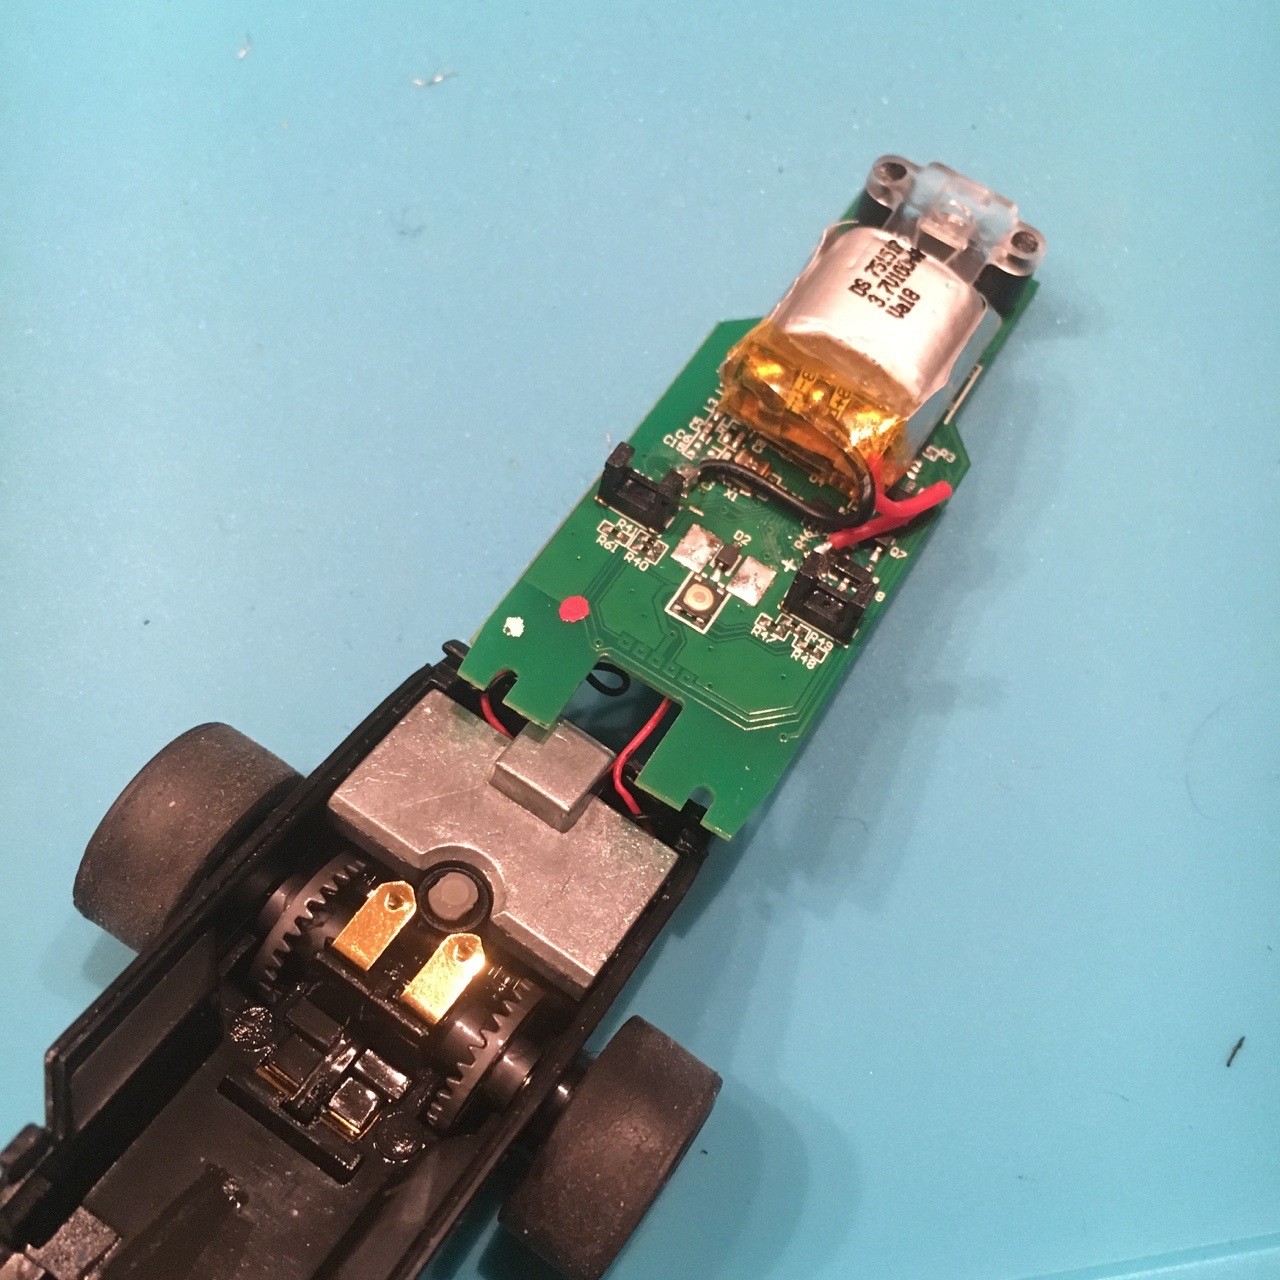
Once the PCB is partially lifted, you’ll be able to see the LiPo battery and the forked light barriers, which are sensors that measure the motor speed. At this point, inspect the battery. A swollen or bloated battery is a clear sign of degradation and potential failure. In the image below, you can see the original battery and its location on the PCB.
2. Replacing the Battery
Now for the battery replacement itself. You’ll need a soldering iron for this step. Heat up your soldering iron and carefully unsolder the two wires connecting the battery to the PCB – one red (positive) and one black (negative).
Using desoldering braid or a desoldering pump can help remove excess solder and make the process cleaner. Crucially, ensure that the exposed wires do not touch any other components on the PCB. Accidental contact could damage the car’s electronics. It’s a good practice to insulate the end of the first wire you desolder with tape to prevent shorts.
Once the old battery is removed, you can install the new one. Again, be cautious to prevent the wires of the new battery from touching any part of the PCB other than the intended solder points. Remember that LiPo batteries hold a charge, so handle them with care. Using tape or a “third hand” tool can help you position and hold the wires steady while soldering.
In this example, a higher-capacity replacement battery is used. The original battery was 70mAh, and the replacement is 100mAh. This upgrade can potentially extend the car’s runtime. You can find replacement batteries online, like this one from ThingPulse. (Use coupon SQUIX-ANKI during checkout to get a discount! You are supporting this blog.)
3. Reassembling and Testing
With the new battery soldered in place, it’s time to reassemble the car. The old battery was held in place with double-sided tape. You can reuse this tape if it’s still sticky, or use a new piece of double-sided tape or create a “tape loop” to secure the new battery to the PCB.
Ensure the battery is positioned so that its end is near the optical sensor. Carefully align the PCB, making sure the motor wires are properly placed in their slots. Slide the PCB back into the hinge at the rear of the car and gently press it down until the latches on the sides click into place.
If your new battery is slightly larger than the original, the PCB might not sit completely flush within the chassis. In most cases, this shouldn’t be a problem. Finally, reattach the car’s hood and secure it with the screw you removed earlier.
Now, the moment of truth – testing! Set up your Anki Overdrive track and pair your car. Test its performance in a race or battle mode. Pay attention to whether the car scans the track correctly and runs smoothly.
Troubleshooting: Still Having Track Scanning Problems?
If you’ve replaced the battery and your Anki Overdrive car is still having trouble scanning the track, here are a few other potential causes to investigate:
- Track Cleanliness: Dust, dirt, or debris on the track surface can interfere with the car’s optical sensors. Clean the track thoroughly with a soft, dry cloth.
- Sensor Obstruction: Double-check that the forked light barriers (optical sensors) on the car are clean and unobstructed. Sometimes, a loose wire or a piece of debris can block the sensors.
- Sensor Damage: In rare cases, the optical sensors themselves might be damaged. This is harder to diagnose without specialized tools, but if you’ve ruled out other causes, sensor damage could be a possibility.
- Connectivity Issues: Ensure your mobile device and the Anki Overdrive app are functioning correctly and that the car is properly paired. Sometimes, a simple restart of the app or device can resolve connection glitches.
While battery replacement can address performance issues that might indirectly affect track scanning, these other factors are more commonly the direct cause of “Anki Overdrive car won’t scan track” problems.
Summary
Replacing the battery in your Anki Overdrive car can be a successful DIY repair, especially if you suspect battery degradation is affecting performance or contributing to issues like track scanning problems. For a small cost and a bit of careful soldering, you can potentially revive your car and even improve its runtime with a higher-capacity battery.
However, remember that this is a modification that voids your warranty and requires caution. Only attempt this repair if you are comfortable with electronics DIY and soldering.
Have you attempted battery replacement in your Anki Overdrive car? Share your experiences and tips in the comments below to help other enthusiasts!